Showing posts with label Tricks. Show all posts

Trick to get a FREE PR6 and monitize it with AdSenset 0

Blog101 | 1:32 PM | , ,

I will tell you how to make an article directory for free and get a PR6 and get 10,000′s pages indexed in Google almost on autopilot and again it is free!
Go here:
http://www.articledashboard.com/
Download the free software and install it.
Go to their forum.
There are services that will automatically post articles to you.
There is a script that lets you automatically aprove those articles.
You can put adsense in there and you will get a high PR (5-6+!).
You can also advertise anything you like on your site, put links to your other sites on the homepage for fast indexing you name it.
I had 26,500 pages indexed within 4 months and all with Adsense on it. This is all done for free and white hat.
Almost all high ranking article directories are using this and so did I
2 years ago. Just check the article directories and you will see that they all use this.
There is a HUGE potential in this and it is all free.
Now go and install it and monitize you “efforts”.

Adsense Tricks – Did you know you can have 7 Ads per page? 0

Blog101 | 12:31 PM | , ,

Hot off the presses from the Inside AdSense blog (the official Google blog from their AdSense team.)
On each page of your site AdSense is now able to support up to:
3 ad units
2 AdSense for Search boxes
1 Link unit
1 Referral button per product (i.e., 1 AdSense referral button and 1 Firefox plus Google Toolbar referral button).
So if you are building a site monetized by AdSense you might be able to make a little extra money by putting in a couple of the new formats of AdSense ads. I�ve been playing around with them and have found some (like the linkbar) to be pretty darn useful!

Make 1200$/month – College Students Method 0

Blog101 | 12:00 PM | , ,

Intro

I AM using this method , it’s not some idea I thought of and that I’m posting on here( which completely beats me why people post money making “ideas” but wtv) I highly suggest you read EVERYTHING instead of bits and pieces.

PS : I DO NOT have much knowledge on SEO so I don’t provide SEO services. As for learning flash, I learn it in 1 week. I watched some youtube videos and bam I was fine. I changed the logo , edited some paragraphs , added some links , took some pictures and uploaded them and bam it’s done. TRUST me go for flash it makes a HUGE difference.
Summary:

This is a twist on providing SEO or Website design services locally, instead we will be offering hosting. You start off small although the income is very residual , in most cases for years with just 1 client. Eventually you’ll have accumulated a good amount of clients and will make an extremely nice pay at the end of the month. We will be giving out QUALITY websites as an incentive for people to sign up to your hosting plan. We will mainly be targeting businesses.
The Method:
1. Hosting
Sign up for hostgator’s reseller hosting plan it’s actually really good and doesn’t have any catches. We will be using this to host our clients websites. You can upgrade your plan easily with them if your hosting too many websites at once.
2. The Website
OK now most people throw up nice wordpress websites as an incentive for clients to use their hosting or SEO services , we on the other hand will have beautiful & sophisticated flash websites.
Head on over to http://www.templatemonster.com/ and look at the templates( don’t worry you won’t spend a heap of money , maybe even nothing). If you don’t know how to use flash, then CMS and Joomla templates are also very nice. Decide what type of business you’d like to advertise your service to( eg: jewelry store , garages , sushi restaurants etc..). Find a template you like and go to www.warez-bb.org to check if someone uploaded it already. If not then maybe look for different templates of your category( they dozens just for 1 category) and check if those are available on warez bb. If that fails to go ahead and buy it.
3.Marketing
So now we have a great looking website , but no clients. The marketing plan I’m about to explain is something I’ve developed over the past year , maybe you might have a better idea although for the newcomers I suggest you stick with what I’m about to say. ALWAYS PRESENT YOURSELF IN PERSON. It works SO much better than cold calling.
A very good way to find businesses with no websites that actually have money to spend on advertising is in the yellowpages( or white) and local newspaper ads. If they don’t have a website address on their ad, chances are they don’t have a website.
When approaching yourself to the business don’t wear a suit and tie , you’ll pass off as a scammer trying to look professional just like the people selling cutco knives( google it . Instead just wear nice jeans and a nice shirt. If you can , find out the full name of the owner and ask for him when you walk in.
Finding out the names of the people that own the store is actually a really big conversion booster because secretaries always tell me to leave my number and tell me the owner will call me after , which doesn’t happen often. Instead when I meet face to face with the owner/manager and I show them a few flash templates they seem to be much more interested.
4. The Money!
How much to charge? Ok this is were we make our money. Instead of 10$ per month which is the typical price for businesses to host their website , I charge 25$. Some business are aware of the going rates of creating a website and they know that a flash website can easily be in the hundreds so they think it’s a bargain , add to the fact that rarely any of these people know the going rate for hosting.

The Math

Currently I have 48 clients for hosting. I would’ve had 53 but 5 canceled since last year. Businesses don’t cancel much , their website subscription lasts as long as the business is up ( usually ).
48 x 25 = 1300$ is my income every month.( abit more actually but I’ll get to that later)
Now for your math…
I’m pushing 4 websites a week , but in the beginning I was getting half the amount every week. Let’s suppose you get 2 clients every week since you probably go to school and/or have a job.
2×4 weeks in a month = 8 x 25$/client = 200$ residual you will get EVERY month from now on.
After 5 months( let’s say your still getting 2 clients a week and not 4)
5 x 200 = 1000$ every month extra. That’s 12 000$ a year.
Now keep in mind , I’m saying 2 per week because that’s how many I was getting in the beginning since I didn’t have much time. Maybe you have much more time than me and will also learn faster than me, so of course you’ll make more money.

IMPORTANT TIPS:

- Have business cards to hand out
- If you having trouble getting the name of the owner either through googling , word of mouth or the yellowpages do the following.
Simply call them up and say that your ordered a certain product and tell the cashier or secretary that the owner said to call him at this time. Eg: Before approaching a flower shop I wanted the name of the owner. I called them up and a girl cashier answered the phone, although I wasn’t sure if she was the cashier so I asked
” Hi is this the owner of Rosario Maria(name of the store)?” ” No it isn’t” ” Oh ok because I ordered a bouquet for my girlfriend’s 1 year anniversary together and the owner told me to talk to her specifically but I forgot her name.( I guessed it was a her because of the name of the shop) ” Ok one moment I’ll pass you the phone” Hello? (this is the owner)” ” Hi is this Lina Dugard?” ” No its Maria Fortugno” ” Oh sorry wrong flower shop excuse me” Hung up the phone. BAM you got a name.Went and pitch 2 weeks later but unfortunately she didn’t need a website
- If the client is satisfied , tell him that if he has any friends that need a website done you’ll give him half the money of whatever he decides to charge them. Either way your making websites for free , extra income on top of your hosting plan is great!
- Actually spend time on the website. If the website is good the word of mouth spreads easily. Throwing up a quick 30 minute wordpress website and just making it look “decent” isn’t going to get the word around. I average 3-4 hours of work per website , sometimes more.
- You can download flash cs5 or cs4 off of warez bb also
- If your young , have the excuse that your creating a portfolio of websites so that they can be graded at the end of the school semester. To make it realistic , at the end of everything ask him if he can be put down as a reference
- If your low on money and needed to purchase a template for eg a jewelry store, market yourself to other jewelry stores but use the same template! :P
Honestly I have very profitable website going and I rarely push the hosting plans anymore. But like I said the last months I was getting 4 clients a week, part time.

Trick to get a FREE PR6 and monitize it with AdSenset 0

Blog101 | 12:52 AM | ,

I will tell you how to make an article directory for free and get a PR6 and get 10,000′s pages indexed in Google almost on autopilot and again it is free!
Go here:
http://www.articledashboard.com/
Download the free software and install it.
Go to their forum.
There are services that will automatically post articles to you.
There is a script that lets you automatically aprove those articles.
You can put adsense in there and you will get a high PR (5-6+!).
You can also advertise anything you like on your site, put links to your other sites on the homepage for fast indexing you name it.
I had 26,500 pages indexed within 4 months and all with Adsense on it. This is all done for free and white hat.
Almost all high ranking article directories are using this and so did I
2 years ago. Just check the article directories and you will see that they all use this.
There is a HUGE potential in this and it is all free.
Now go and install it and monitize you “efforts”.

How To Create "Scroll to Top" button? 0

Blog101 | 2:40 PM | , , ,

Scroll to top button is very useful for bloggers if their have long blogs.To Add "scroll to top" button to your blog ,follow the steps below.
1.Log in to your dashboard--> layout- -> Edit HTML

2.Scroll down to where you see this:
]]></b:skin>
3.Now add below CSS code before  ]]></b:skin>  tag .
/* to top */
#toTop { width:100px;background:#F4FFBF;border:1px solid #ccc;text-align:center;padding:5px;position:fixed;bottom:10px;right:10px;cursor:pointer;color:#666;text-decoration:none; }


4.Now add below code  before  </body>  tag:
<a href="#" id="toTop">^ Scroll to Top</a>


<script src='http://ajax.googleapis.com/ajax/libs/jquery/1.3.2/jquery.min.js' type='text/javascript'></script>
<script type='text/javascript'>
/*-----------------------
* jQuery Plugin: Scroll to Top
* by Craig Wilson, Ph.Creative (http://www.ph-creative.com)
* Bring to you by Zen from http://zenplate.blogspot.com
* Copyright (c) 2009 Ph.Creative Ltd.
* Description: Adds an unobtrusive "Scroll to Top" link to your page with smooth scrolling.
* For usage instructions and version updates to go http://blog.ph-creative.com/post/jquery-plugin-scroll-to-top.aspx
* Do not delete these infomation
* Version: 1.0, 12/03/2009
-----------------------*/

$(function(){$.fn.scrollToTop=function(){$(this).hide().removeAttr("href");if($(window).scrollTop()!="0"){$(this).fadeIn("slow")}var scrollDiv=$(this);$(window).scroll(function(){if($(window).scrollTop()=="0"){$(scrollDiv).fadeOut("slow")}else{$(scrollDiv).fadeIn("slow")}});$(this).click(function(){$("html, body").animate({scrollTop:0},"slow")})}});

$(function() {
$("#toTop").scrollToTop();
});
</script>
5.Now save your template and you are done.Look at the picture below.

How To Delete "Border" when adding images in blogger? 0

Blog101 | 1:39 PM | , , ,

1.Log in to your dashboard--> layout- -> Edit HTML

2.Click on "Expand Widget Templates"
3.Scroll down to where you see this:
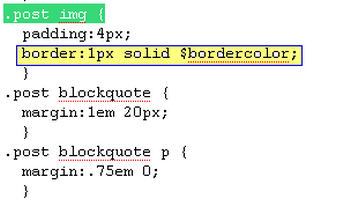
.post img {

4.Now look at the picture below.

5.Delete yellow part ( border:1px solid $bordercolor; ) of the picture from your template.
Note : If you can not find exactly similar code to  border:1px solid $bordercolor;  , delete the part has the word "border"
6.Now save your template and you are done.

How To Add Twit This! Icon below your blog post? 0

Blog101 | 12:39 PM | , , ,

1.Log in to your dashboard--> layout- -> Edit HTML

2.Click on "Expand Widget Templates"
3.Scroll down to where you see this:
]]></b:skin>
4.Now copy below code and paste it before above code.
.share-twitthis{
background:url(http://tinyurl.com/ay2jsc) 10px top no-repeat;
padding-left:42px;
font-size:11px;
line-height:18px;
}
Look at the picture below.

5.Now again scroll down to where you see this :
<p><data:post.body/></p>
6.Copy and paste below right after above line.
<div class='share-twitthis'>
<a expr:href='&quot;http://twitthis.com/twit?url=&quot; + data:post.url + &quot;&amp;title=&quot; + data:post.title'>Twit This!</a></div>
7.Now save your template and you are done.

How To Add Related Post Widget to Blogger? 0

Blog101 | 7:05 AM | , , ,

There some advantages of adding the related post widget in your blog ; the reader will be able to find more articles that related to the article they are reading and Reader can stay longer in your blog .
1.Log in to your dashboard--> layout- -> Edit HTML
2.Click on "Expand Widget Templates"
3.Scroll down to where you see this:
<data:post.body/>
4.After the above code , copy and paste the code below:
<!--Related Post javascripts start from here-->
<b:if cond='data:blog.pageType == &quot;item&quot;'>
<div class='similiar'>

<div class='widget-content'>
<h3>Related Posts :</h3>
<div id='data2007'/><br/><br/>
<script type='text/javascript'>

var homeUrl3 = &quot;<data:blog.homepageUrl/>&quot;;
var maxNumberOfPostsPerLabel = 4;
var maxNumberOfLabels = 10;

maxNumberOfPostsPerLabel = 100;
maxNumberOfLabels = 3;

function listEntries10(json) {
var ul = document.createElement(&#39;ul&#39;);
var maxPosts = (json.feed.entry.length &lt;= maxNumberOfPostsPerLabel) ?
json.feed.entry.length : maxNumberOfPostsPerLabel;
for (var i = 0; i &lt; maxPosts; i++) {
var entry = json.feed.entry[i];
var alturl;

for (var k = 0; k &lt; entry.link.length; k++) {
if (entry.link[k].rel == &#39;alternate&#39;) {
alturl = entry.link[k].href;
break;
}
}
var li = document.createElement(&#39;li&#39;);
var a = document.createElement(&#39;a&#39;);
a.href = alturl;

if(a.href!=location.href) {
var txt = document.createTextNode(entry.title.$t);
a.appendChild(txt);
li.appendChild(a);
ul.appendChild(li);
}
}
for (var l = 0; l &lt; json.feed.link.length; l++) {
if (json.feed.link[l].rel == &#39;alternate&#39;) {
var raw = json.feed.link[l].href;
var label = raw.substr(homeUrl3.length+13);
var k;
for (k=0; k&lt;20; k++) label = label.replace(&quot;%20&quot;, &quot; &quot;);
var txt = document.createTextNode(label);
var h = document.createElement(&#39;b&#39;);
h.appendChild(txt);
var div1 = document.createElement(&#39;div&#39;);
div1.appendChild(h);
div1.appendChild(ul);
document.getElementById(&#39;data2007&#39;).appendChild(div1);
}
}
}
function search10(query, label) {

var script = document.createElement(&#39;script&#39;);
script.setAttribute(&#39;src&#39;, query + &#39;feeds/posts/default/-/&#39;
+ label +
&#39;?alt=json-in-script&amp;callback=listEntries10&#39;);
script.setAttribute(&#39;type&#39;, &#39;text/javascript&#39;);
document.documentElement.firstChild.appendChild(script);
}

var labelArray = new Array();
var numLabel = 0;

<b:loop values='data:posts' var='post'>
<b:loop values='data:post.labels' var='label'>
textLabel = &quot;<data:label.name/>&quot;;

var test = 0;
for (var i = 0; i &lt; labelArray.length; i++)
if (labelArray[i] == textLabel) test = 1;
if (test == 0) {
labelArray.push(textLabel);
var maxLabels = (labelArray.length &lt;= maxNumberOfLabels) ?
labelArray.length : maxNumberOfLabels;
if (numLabel &lt; maxLabels) {
search10(homeUrl3, textLabel);
numLabel++;
}
}
</b:loop>
</b:loop>
</script>
</div>

</div>
</b:if>
<!--Related Post javascripts End here-->


5.Click on "Save Templates" and refresh your site.

How To Add Top Commentators Widget for Blogger? 0

Blog101 | 3:04 PM | , ,

If you like to add Top Commentators Widget to your blog follow the steps below.It will increase the commenting rate on blogs.
1.Log in to your dashboard--> layout- ->Page Elements

2.Click on 'Add a Gadget' on the sidebar.

3.Select 'HTML/Javascript' and add the code given below and click save.

<script type="text/javascript">
function pipeCallback(obj) {
document.write('<ol>');
var i;
for (i = 0; i < obj.count ; i++)
{
var href = "'" + obj.value.items[i].link + "'";
if(obj.value.items[i].link == "")
var item ="<li>" + obj.value.items[i].title + "</li>";
else
var item = "<li>" + "<a href=" + href + ">" + obj.value.items[i].title + "</a> </li>";
document.write(item);
}
document.write('</ol>');
}
</script>
<script src="http://pipes.yahoo.com/pipes/pipe.run?_render=json&_callback=pipeCallback&_id=2f414149ab66e0892a6a179016f93019&url=http%3A%2F%2Fyourblog.blogspot.com&num=10&filter=" type="text/javascript"></script>


Note : Remember to replace yourblog with your blog name.Do not include http://

You are done.

Big Font Trick For Bloggers 0

Blog101 | 2:32 PM | ,

f you want become large first letter of your paragraph follow below steps to do it.
1.Log in to your dashboard--> layout- ->Edit HTML
2.Scroll down to where you see this :
]]></b:skin>
3.Now Add the below codes before  the above code.
.newspaper {
float:left;
color:#000;
background:#fff;
line-height:80px;
padding-:1px 5px 0 0;
font-family:times;
font-size:100px;
}
4.Now save your Template.
5.Now when you write a post ,add the below codes manually Before starting every post and Replace Frist Letter with your real post first letter.
<span class="newspaper">Frist Letter</span>


Look at the example below.
<span class="newspaper">T</span>oyota offers every type of vehicle from trucks to compact cars, giving you the option to choose the size and type of car that best fits your lifestyle. Many thing need to be considered when choosing a new car. If you have small children, safety is a large factor, as well as size depending on how many children you have. However, you may be a single mom or a bachelor simply looking for something fun and stylish. Either way, it’s important to find a car that makes you happy, and chances are high that a Pittsburgh Toyota will dealership can meet your needs.


Toyota offers every type of vehicle from trucks to compact cars, giving you the option to choose the size and type of car that best fits your lifestyle. Many thing need to be considered when choosing a new car. If you have small children, safety is a large factor, as well as size depending on how many children you have. However, you may be a single mom or a bachelor simply looking for something fun and stylish. Either way, it’s important to find a car that makes you happy, and chances are high that a Pittsburgh Toyota will dealership can meet your needs.

How To add Image Icon Before or After Post Titles? 0

Blog101 | 5:39 PM | , ,

1.Log in to your dashboard--> layout- -> Edit HTML

2.Click on "Expand Widget Templates"
3.Scroll down to where you see this:-


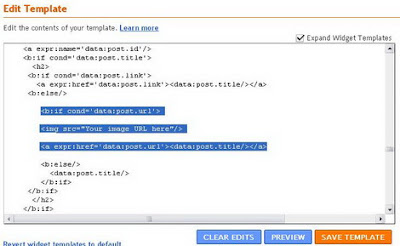
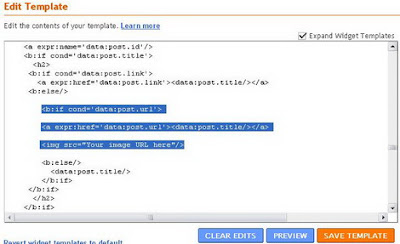
<b:if cond='data:post.url'>
<a expr:href='data:post.url'><data:post.title/></a>
4.If you want to add image Before post title then add below code between above 2 lines.


<img src="Your image URL here"/>
Note : Remember to Replace "Your image URL here" with your real image URL.
After adding code, it look like below.


If you want to add image After post title then add the code like this.(after the above 2 lines)

5.Click on "Save Templates" and you are done.

How To Add Icons on Every Blogger Widget of Blogger ? 0

Blog101 | 4:36 PM | , ,

Adding Icons on your Every Blogger Widget , you can give a good look to your blog.Follow these simple steps to do it.
1.Log in to your dashboard--> layout- -> Edit HTML
2.Click on "Expand Widget Templates"
3.Scroll down to where you see this:
.main .Blog {
border-bottom-width: 0;
}
4.After the above code , copy and paste the code below:
.sidebar .widget h2 {
background: yellow url('URL OF YOUR IMAGE') no-repeat left top;
margin-top:5px;
text-indent: 20px;
padding:7px;
}
5.Click on "Save Templates" and you are done.
Note : You must replace URL OF YOUR IMAGE with your image(Icon) URL.
You can change background colour and other values of above codes if you like.

How To Add "Read More" Feature To Blogger Post? 0

Blog101 | 2:32 PM | ,

1.Log in to your dashboard--> layout- -> Edit HTML
2.Click on "Expand Widget Templates"
3.Scroll down to where you see this:
<p><data:post.body/></p>

4.Replace above code with below code.
<b:if cond='data:blog.pageType == "item"'>
<style>.fullpost{display:inline;}</style>
<p><data:post.body/></p>
<b:else/>
<style>.fullpost{display:none;}</style>
<p><data:post.body/>
<a expr:href='data:post.url'><strong>Read more...</strong></a></p>
</b:if>


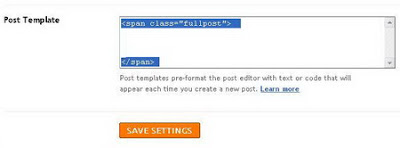
5.Click on "Save Templates"6.Now go to Setting-->formatting-->Post Template.
7.Fill that "Post Template" blank text area with below code :
<span class="fullpost">


</span>
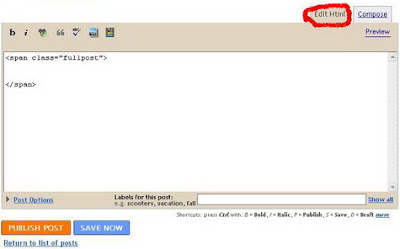
Look at the picture below.

8.Click on "Save settings"
9.When you post your article, choose "Edit Html" tab. and you will see the code below :
<span class="fullpost">


</span>
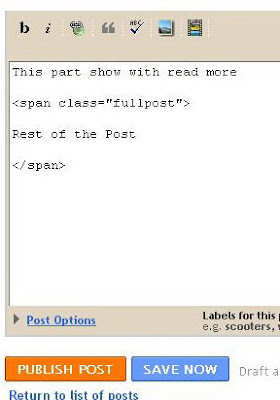
Look at this image.


10.Place the paragraps you want show with read more, above of below line.
<span class="fullpost">
11.Place the rest of the post (you want to hide) between below 2 lines.
<span class="fullpost">


</span>


Look at the image below.

12.Then Publish your post.You are done.
Note :If you want to add this feature to your old posts ,do the 9-12 steps to each posts.

Add Related Post Widget to Blogger-For Modified Templates 0

Blog101 | 1:32 PM | , ,

1.Log in to your dashboard--> layout- -> Edit HTML
2.Click on "Expand Widget Templates"
3.Scroll down to where you see this:
<b:if cond='data:blog.pageType == "item"'>
<style>.fullpost{display:inline;}</style>
<p><data:post.body/></p>

<b:else/>
<style>.fullpost{display:none;}</style>
<p><data:post.body/>
<a expr:href='data:post.url'><strong>Read more...</strong></a></p>
</b:if>
4.Copy Below code.
<b:if cond='data:blog.pageType == "item"'>
<div class='similiar'>

<div class='widget-content'>
<h3>Related Posts :</h3>
<div id='data2007'/><br/><br/>
<script type='text/javascript'>

var homeUrl3 = &quot;<data:blog.homepageUrl/>&quot;;
var maxNumberOfPostsPerLabel = 4;
var maxNumberOfLabels = 10;

maxNumberOfPostsPerLabel = 100;
maxNumberOfLabels = 3;


function listEntries10(json) {
var ul = document.createElement(&#39;ul&#39;);
var maxPosts = (json.feed.entry.length &lt;= maxNumberOfPostsPerLabel) ?
json.feed.entry.length : maxNumberOfPostsPerLabel;
for (var i = 0; i &lt; maxPosts; i++) {
var entry = json.feed.entry[i];
var alturl;

for (var k = 0; k &lt; entry.link.length; k++) {
if (entry.link[k].rel == &#39;alternate&#39;) {
alturl = entry.link[k].href;
break;
}
}
var li = document.createElement(&#39;li&#39;);
var a = document.createElement(&#39;a&#39;);
a.href = alturl;

if(a.href!=location.href) {
var txt = document.createTextNode(entry.title.$t);
a.appendChild(txt);
li.appendChild(a);
ul.appendChild(li);
}
}
for (var l = 0; l &lt; json.feed.link.length; l++) {
if (json.feed.link[l].rel == &#39;alternate&#39;) {
var raw = json.feed.link[l].href;
var label = raw.substr(homeUrl3.length+13);
var k;
for (k=0; k&lt;20; k++) label = label.replace(&quot;%20&quot;, &quot; &quot;);
var txt = document.createTextNode(label);
var h = document.createElement(&#39;b&#39;);
h.appendChild(txt);
var div1 = document.createElement(&#39;div&#39;);
div1.appendChild(h);
div1.appendChild(ul);
document.getElementById(&#39;data2007&#39;).appendChild(div1);
}
}
}
function search10(query, label) {

var script = document.createElement(&#39;script&#39;);
script.setAttribute(&#39;src&#39;, query + &#39;feeds/posts/default/-/&#39;
+ label +
&#39;?alt=json-in-script&amp;callback=listEntries10&#39;);
script.setAttribute(&#39;type&#39;, &#39;text/javascript&#39;);
document.documentElement.firstChild.appendChild(script);
}

var labelArray = new Array();
var numLabel = 0;

<b:loop values='data:posts' var='post'>
<b:loop values='data:post.labels' var='label'>
textLabel = &quot;<data:label.name/>&quot;;

var test = 0;
for (var i = 0; i &lt; labelArray.length; i++)
if (labelArray[i] == textLabel) test = 1;
if (test == 0) {
labelArray.push(textLabel);
var maxLabels = (labelArray.length &lt;= maxNumberOfLabels) ?
labelArray.length : maxNumberOfLabels;
if (numLabel &lt; maxLabels) {
search10(homeUrl3, textLabel);
numLabel++;
}
}
</b:loop>
</b:loop>
</script>
</div>

</div>
</b:if>

5.Now Paste it like the example below.
<b:if cond='data:blog.pageType == "item"'>
<style>.fullpost{display:inline;}</style>
<p><data:post.body/></p>

Paste Your Code here

<b:else/>
<style>.fullpost{display:none;}</style>
<p><data:post.body/>
<a expr:href='data:post.url'><strong>Read more...</strong></a></p>
</b:if>


6.Click on "Save Templates" and refresh your site.

How To Hidden Blogger Header and Replace Image Instead? 0

Blog101 | 2:45 PM | , ,

1.Log in to your dashboard--> layout- -> Edit HTML

2.Scroll down to where you see header-wrapper code block.It will nearly look like this:

#header-wrapper {
width:800px;
margin:0 auto 10px;
border:1px solid $bordercolor;
}


Note :- width:800px can be different value.

3.Now add "display:none;" into your header-wrapper code block.Look at below:

#header-wrapper {
width:800px;
margin:0 auto 10px;
border:1px solid $bordercolor;
display:none;
}


Done. above code hides your blog header.

4.To use a image instead header,find the below code.

<div id='header-wrapper'>
<b:section class='header' id='header' maxwidgets='1' showaddelement='no'>
<b:widget id='Header1' locked='true' title='your header title' type='Header'/>
</b:section>
</div>


5.Now paste the below code just after the above code.

<a href="URL_OF_YOUR_BLOG"><img src="URL_OF_THE_IMAGE" alt="Home" /></a>


Note : Replace URL_OF_YOUR_BLOG and URL_OF_THE_IMAGE with your content.

6.Click on "Save Templates" and you are done.

How to Add “Save Page as PDF” button to Blogger blog? 0

Blog101 | 2:10 PM | , ,

1.First Sign up with Web2PDF.

2.Now Configure your "Save Page as PDF" button and click "Generate the JavaScript" button.

3.Then a Javascript code will be generated. Copy This code.

Now follow these simple steps :

(a)Log in to your dashboard--> layout- -> Edit HTML

(b)Click on "Expand Widget Templates"

(c)Scroll down to where you see this:

<data:post.body/>


(d)Immediately after above line, paste the code which you have generated at the Web2Pdf Online website. It's look like below code:

<!-- START: PDF Online Script -->
<script type="text/javascript">
var authorId = "XXXXXXXX-XXXX-XXXX-XXX-XXXXXXX";
var pageOrientation = "0";
var topMargin = "0.5";
var bottomMargin = "0.5";
var leftMargin = "0.5";
var rightMargin = "0.5";
</script>
<script type="text/javascript" src="http://web2.pdfonline.com/pdfonline/pdfonline.js">
</script>
<!-- END: PDF Online Script -->


(e)Click on "Save Templates" and Refresh your site.

How To Add Page Popularity and Top popular pages widget? 0

Blog101 | 1:50 PM | , , ,

1.Log in to your dashboard--> layout- -> Edit HTML

2.Click on "Expand Widget Templates"

3.Scroll down to where you see this:-


<p><data:post.body/></p>

Add Page Popularity Widget

Paste the below code just after <p><data:post.body/></p>.


<img expr:src='"http://foxrecord.appspot.com/rating?url=" + data:post.url + "&amp;title=" + data:post.title' />


Add Top popular pages widget

Paste the below code just after <p><data:post.body/></p>.


<script src="http://foxrecord.com/scripts/gettop.js" type="text/javascript"></script>


4.Click on "Save Templates" and you are done.

How To Highlight Author Comment in Blogger blog? 0

Blog101 | 11:21 AM | , , ,

This tip is very usefull for every blogger.If you like this follow the steps below.

1.Log in to your dashboard--> layout- -> Edit HTML

2.Click on "Expand Widget Templates"

3.Scroll down to where you see this:-

]]></b:skin>

4.Copy below code and put it before ]]></b:skin>

.comment-body-author {
background: #E6E6E6; /* Background color*/
color: #000; /* Text color*/
border-top: 1px dotted #223344;border-bottom: 1px dotted #223344;border-left: 1px dotted #223344;border-right: 1px dotted #223344;
margin:0;
padding:0 0 0 20px; /* Posotion*/
}

5.Now Scroll down to where you see this:-

<dl id='comments-block'>
<b:loop values='data:post.comments' var='comment'>
<dt class='comment-author' expr:id='"comment-" + data:comment.id'>
<a expr:name='"comment-" + data:comment.id'/>
<b:if cond='data:comment.authorUrl'>
<a expr:href='data:comment.authorUrl' rel='nofollow'><data:comment.author/></a>
<b:else/>
<data:comment.author/>
</b:if>
said...
</dt>

<dd class='comment-body'>
<b:if cond='data:comment.isDeleted'>
<span class='deleted-comment'><data:comment.body/></span>
<b:else/>
<p><data:comment.body/></p>
</b:if>
</dd>

6.Replace above code with below code.

<dl id='comments-block'>
<b:loop values='data:post.comments' var='comment'>
<dt class='comment-author' expr:id='"comment-" + data:comment.id'>
<a expr:name='"comment-" + data:comment.id'/>
<b:if cond='data:comment.authorUrl'>
<a expr:href='data:comment.authorUrl' rel='nofollow'><data:comment.author/></a>
<b:else/>
<data:comment.author/>
</b:if>
said...
</dt>

<b:if cond='data:comment.author == data:post.author'>
<dd class='comment-body-author'>
<p><data:comment.body/></p>
</dd>
<b:else/>

<dd class='comment-body'>
<b:if cond='data:comment.isDeleted'>
<span class='deleted-comment'><data:comment.body/></span>
<b:else/>
<p><data:comment.body/></p>
</b:if>
</dd>

</b:if>

7.Click on "Save Templates" and you are done.

Note : You can change "Background color" , "Text color" and "Posotion" of above codes.

How To Change Colours of Blogger Templates? 0

Blog101 | 7:27 AM | , ,

How To Change Blogger Header background color
log in to your dashboard--> layout- -> Edit HTML, scroll to where you see this:-

#header-wrapper {


Add immediately after that the following line:-

background:your clour;

If You want background colour set to #D3FFCC , above code must change like this.
background:#D3FFCC;

See the example below.

#header-wrapper {
background:#D3FFCC;

Save the template and refresh your site.


How To Change Blogger Main background color

log in to your dashboard--> layout- -> Edit HTML, scroll to where you see this:-

body {
background:$bgcolor;

If you want to set bgcolor to #d3ffcc , replace above code with this.

body {
background-color:#d3ffcc;
Save the template and refresh your site.

How To Change Blogger Post background color

log in to your dashboard--> layout- -> Edit HTML, scroll to where you see this:-

#main-wrapper {

If you want to set post color to #d3ffcc , replace above code with this.

#main-wrapper {
background-color:#d3ffcc;

Save the template and refresh your site.

How To Change Blogger Sidebar background color

log in to your dashboard--> layout- -> Edit HTML, scroll to where you see this:-

#sidebar-wrapper {
If you want to set sidebar color to #d3ffcc , replace above code with this.

#sidebar-wrapper {
background-color:#d3ffcc;

Save the template and refresh your site.

How To Remove Blogger Navbar? 0

Blog101 | 6:40 AM | , ,

This quick tutorial will show you how to remove/hidden blogger navbar from your blog.Follow the steps given below.


Login to your blogger dashboard--> layout- -> Edit HTML

Put the following code as the picture below.

#navbar-iframe { height:0px; visibility:hidden; display:none; }


Now save your template and you are done.