Showing posts with label Background. Show all posts

How To Delete "Border" when adding images in blogger? 0

Blog101 | 1:39 PM | , , ,

1.Log in to your dashboard--> layout- -> Edit HTML

2.Click on "Expand Widget Templates"
3.Scroll down to where you see this:
.post img {

4.Now look at the picture below.

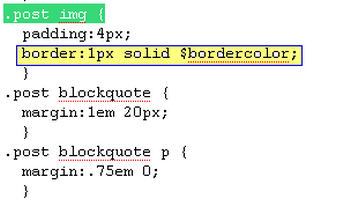
5.Delete yellow part ( border:1px solid $bordercolor; ) of the picture from your template.
Note : If you can not find exactly similar code to  border:1px solid $bordercolor;  , delete the part has the word "border"
6.Now save your template and you are done.

How To Add Floating Bar on Top of blogger blog? 0

Blog101 | 12:43 PM | , , ,

1.Log in to your dashboard--> layout- ->Page Elements
2.Click on 'Add a Gadget' on the sidebar.
3.Select 'HTML/Javascript' and add the code given below and click save.
<style type="text/css">
#topbar{
position:absolute;
border: 1px solid black;
padding: 2px;
background-color: lightyellow;
width: 620px;

visibility: hidden;
z-index: 100;
}
</style>

<script type="text/javascript">
/***********************************************
* Floating Top Bar script- © Dynamic Drive (www.dynamicdrive.com)
* Sliding routine by Roy Whittle (http://www.javascript-fx.com/)
* This notice must stay intact for legal use.
* Visit http://www.dynamicdrive.com/ for full source code
*Make it works on blogger by Zen :http://zenplate.blogspot.com
***********************************************/

var persistclose=0 //set to 0 or 1. 1 means once the bar is manually closed, it will remain closed for browser session
var startX = 30 //set x offset of bar in pixels
var startY = 5 //set y offset of bar in pixels
var verticalpos="fromtop" //enter "fromtop" or "frombottom"

function iecompattest(){
return (document.compatMode && document.compatMode!="BackCompat")? document.documentElement : document.body
}

function get_cookie(Name) {
var search = Name + "="
var returnvalue = "";
if (document.cookie.length > 0) {
offset = document.cookie.indexOf(search)
if (offset != -1) {
offset += search.length
end = document.cookie.indexOf(";", offset);
if (end == -1) end = document.cookie.length;
returnvalue=unescape(document.cookie.substring(offset, end))
}
}
return returnvalue;
}

function closebar(){
if (persistclose)
document.cookie="remainclosed=1"
document.getElementById("topbar").style.visibility="hidden"
}

function staticbar(){
barheight=document.getElementById("topbar").offsetHeight
var ns = (navigator.appName.indexOf("Netscape") != -1) || window.opera;
var d = document;
function ml(id){
var el=d.getElementById(id);
if (!persistclose || persistclose && get_cookie("remainclosed")=="")
el.style.visibility="visible"
if(d.layers)el.style=el;
el.sP=function(x,y){this.style.left=x+"px";this.style.top=y+"px";};
el.x = startX;
if (verticalpos=="fromtop")
el.y = startY;
else{
el.y = ns ? pageYOffset + innerHeight : iecompattest().scrollTop + iecompattest().clientHeight;
el.y -= startY;
}
return el;
}
window.stayTopLeft=function(){
if (verticalpos=="fromtop"){
var pY = ns ? pageYOffset : iecompattest().scrollTop;
ftlObj.y += (pY + startY - ftlObj.y)/8;
}
else{
var pY = ns ? pageYOffset + innerHeight - barheight: iecompattest().scrollTop + iecompattest().clientHeight - barheight;
ftlObj.y += (pY - startY - ftlObj.y)/8;
}
ftlObj.sP(ftlObj.x, ftlObj.y);
setTimeout("stayTopLeft()", 10);
}
ftlObj = ml("topbar");
stayTopLeft();
}

if (window.addEventListener)
window.addEventListener("load", staticbar, false)
else if (window.attachEvent)
window.attachEvent("onload", staticbar)
else if (document.getElementById)
window.onload=staticbar
</script>

<div id="topbar">
<a href="#" onclick="closebar(); return false"><img src="http://www.gigaimage.com/images/6gxult9ji6pxr9r7wo.gif" align="right" border="0" />
<a href="YOUR LINK" onclick="closebar(); return true">YOUR TEXT
</div>
Note : Remember to replace YOUR LINK and YOUR TEXT with your details.

How To Add Related Post Widget to Blogger? 0

Blog101 | 7:05 AM | , , ,

There some advantages of adding the related post widget in your blog ; the reader will be able to find more articles that related to the article they are reading and Reader can stay longer in your blog .
1.Log in to your dashboard--> layout- -> Edit HTML
2.Click on "Expand Widget Templates"
3.Scroll down to where you see this:
<data:post.body/>
4.After the above code , copy and paste the code below:
<!--Related Post javascripts start from here-->
<b:if cond='data:blog.pageType == &quot;item&quot;'>
<div class='similiar'>

<div class='widget-content'>
<h3>Related Posts :</h3>
<div id='data2007'/><br/><br/>
<script type='text/javascript'>

var homeUrl3 = &quot;<data:blog.homepageUrl/>&quot;;
var maxNumberOfPostsPerLabel = 4;
var maxNumberOfLabels = 10;

maxNumberOfPostsPerLabel = 100;
maxNumberOfLabels = 3;

function listEntries10(json) {
var ul = document.createElement(&#39;ul&#39;);
var maxPosts = (json.feed.entry.length &lt;= maxNumberOfPostsPerLabel) ?
json.feed.entry.length : maxNumberOfPostsPerLabel;
for (var i = 0; i &lt; maxPosts; i++) {
var entry = json.feed.entry[i];
var alturl;

for (var k = 0; k &lt; entry.link.length; k++) {
if (entry.link[k].rel == &#39;alternate&#39;) {
alturl = entry.link[k].href;
break;
}
}
var li = document.createElement(&#39;li&#39;);
var a = document.createElement(&#39;a&#39;);
a.href = alturl;

if(a.href!=location.href) {
var txt = document.createTextNode(entry.title.$t);
a.appendChild(txt);
li.appendChild(a);
ul.appendChild(li);
}
}
for (var l = 0; l &lt; json.feed.link.length; l++) {
if (json.feed.link[l].rel == &#39;alternate&#39;) {
var raw = json.feed.link[l].href;
var label = raw.substr(homeUrl3.length+13);
var k;
for (k=0; k&lt;20; k++) label = label.replace(&quot;%20&quot;, &quot; &quot;);
var txt = document.createTextNode(label);
var h = document.createElement(&#39;b&#39;);
h.appendChild(txt);
var div1 = document.createElement(&#39;div&#39;);
div1.appendChild(h);
div1.appendChild(ul);
document.getElementById(&#39;data2007&#39;).appendChild(div1);
}
}
}
function search10(query, label) {

var script = document.createElement(&#39;script&#39;);
script.setAttribute(&#39;src&#39;, query + &#39;feeds/posts/default/-/&#39;
+ label +
&#39;?alt=json-in-script&amp;callback=listEntries10&#39;);
script.setAttribute(&#39;type&#39;, &#39;text/javascript&#39;);
document.documentElement.firstChild.appendChild(script);
}

var labelArray = new Array();
var numLabel = 0;

<b:loop values='data:posts' var='post'>
<b:loop values='data:post.labels' var='label'>
textLabel = &quot;<data:label.name/>&quot;;

var test = 0;
for (var i = 0; i &lt; labelArray.length; i++)
if (labelArray[i] == textLabel) test = 1;
if (test == 0) {
labelArray.push(textLabel);
var maxLabels = (labelArray.length &lt;= maxNumberOfLabels) ?
labelArray.length : maxNumberOfLabels;
if (numLabel &lt; maxLabels) {
search10(homeUrl3, textLabel);
numLabel++;
}
}
</b:loop>
</b:loop>
</script>
</div>

</div>
</b:if>
<!--Related Post javascripts End here-->


5.Click on "Save Templates" and refresh your site.

Big Font Trick For Bloggers 0

Blog101 | 2:32 PM | ,

f you want become large first letter of your paragraph follow below steps to do it.
1.Log in to your dashboard--> layout- ->Edit HTML
2.Scroll down to where you see this :
]]></b:skin>
3.Now Add the below codes before  the above code.
.newspaper {
float:left;
color:#000;
background:#fff;
line-height:80px;
padding-:1px 5px 0 0;
font-family:times;
font-size:100px;
}
4.Now save your Template.
5.Now when you write a post ,add the below codes manually Before starting every post and Replace Frist Letter with your real post first letter.
<span class="newspaper">Frist Letter</span>


Look at the example below.
<span class="newspaper">T</span>oyota offers every type of vehicle from trucks to compact cars, giving you the option to choose the size and type of car that best fits your lifestyle. Many thing need to be considered when choosing a new car. If you have small children, safety is a large factor, as well as size depending on how many children you have. However, you may be a single mom or a bachelor simply looking for something fun and stylish. Either way, it’s important to find a car that makes you happy, and chances are high that a Pittsburgh Toyota will dealership can meet your needs.


Toyota offers every type of vehicle from trucks to compact cars, giving you the option to choose the size and type of car that best fits your lifestyle. Many thing need to be considered when choosing a new car. If you have small children, safety is a large factor, as well as size depending on how many children you have. However, you may be a single mom or a bachelor simply looking for something fun and stylish. Either way, it’s important to find a car that makes you happy, and chances are high that a Pittsburgh Toyota will dealership can meet your needs.

How To Remove 'Showing Posts With Label'? 0

Blog101 | 1:45 PM | , ,

1.Log in to your dashboard--> layout- -> Edit HTML

2.Click on "Expand Widget Templates"
3.Scroll down to where you see this:-
<b:includable id='status-message'>
<b:if cond='data:navMessage'>
<div class='status-msg-wrap'>
<div class='status-msg-body'>
<data:navMessage/>
</div>
<div class='status-msg-border'>
<div class='status-msg-bg'>
<div class='status-msg-hidden'><data:navMessage/></div>
</div>
</div>
</div>
<div style='clear: both;'/>
</b:if>
</b:includable>
4.Now Replace above code with below code :
<b:includable id='status-message'>
<b:if cond='data:navMessage'>
<div>
</div>
<div style='clear: both;'/>
</b:if>
</b:includable>
5.Click on "Save Templates" and you are done.

How To Add Icons on Every Blogger Widget of Blogger ? 0

Blog101 | 4:36 PM | , ,

Adding Icons on your Every Blogger Widget , you can give a good look to your blog.Follow these simple steps to do it.
1.Log in to your dashboard--> layout- -> Edit HTML
2.Click on "Expand Widget Templates"
3.Scroll down to where you see this:
.main .Blog {
border-bottom-width: 0;
}
4.After the above code , copy and paste the code below:
.sidebar .widget h2 {
background: yellow url('URL OF YOUR IMAGE') no-repeat left top;
margin-top:5px;
text-indent: 20px;
padding:7px;
}
5.Click on "Save Templates" and you are done.
Note : You must replace URL OF YOUR IMAGE with your image(Icon) URL.
You can change background colour and other values of above codes if you like.

How To Add "Read More" Feature To Blogger Post? 0

Blog101 | 2:32 PM | ,

1.Log in to your dashboard--> layout- -> Edit HTML
2.Click on "Expand Widget Templates"
3.Scroll down to where you see this:
<p><data:post.body/></p>

4.Replace above code with below code.
<b:if cond='data:blog.pageType == "item"'>
<style>.fullpost{display:inline;}</style>
<p><data:post.body/></p>
<b:else/>
<style>.fullpost{display:none;}</style>
<p><data:post.body/>
<a expr:href='data:post.url'><strong>Read more...</strong></a></p>
</b:if>


5.Click on "Save Templates"6.Now go to Setting-->formatting-->Post Template.
7.Fill that "Post Template" blank text area with below code :
<span class="fullpost">


</span>
Look at the picture below.

8.Click on "Save settings"
9.When you post your article, choose "Edit Html" tab. and you will see the code below :
<span class="fullpost">


</span>
Look at this image.


10.Place the paragraps you want show with read more, above of below line.
<span class="fullpost">
11.Place the rest of the post (you want to hide) between below 2 lines.
<span class="fullpost">


</span>


Look at the image below.

12.Then Publish your post.You are done.
Note :If you want to add this feature to your old posts ,do the 9-12 steps to each posts.

Add Related Post Widget to Blogger-For Modified Templates 0

Blog101 | 1:32 PM | , ,

1.Log in to your dashboard--> layout- -> Edit HTML
2.Click on "Expand Widget Templates"
3.Scroll down to where you see this:
<b:if cond='data:blog.pageType == "item"'>
<style>.fullpost{display:inline;}</style>
<p><data:post.body/></p>

<b:else/>
<style>.fullpost{display:none;}</style>
<p><data:post.body/>
<a expr:href='data:post.url'><strong>Read more...</strong></a></p>
</b:if>
4.Copy Below code.
<b:if cond='data:blog.pageType == "item"'>
<div class='similiar'>

<div class='widget-content'>
<h3>Related Posts :</h3>
<div id='data2007'/><br/><br/>
<script type='text/javascript'>

var homeUrl3 = &quot;<data:blog.homepageUrl/>&quot;;
var maxNumberOfPostsPerLabel = 4;
var maxNumberOfLabels = 10;

maxNumberOfPostsPerLabel = 100;
maxNumberOfLabels = 3;


function listEntries10(json) {
var ul = document.createElement(&#39;ul&#39;);
var maxPosts = (json.feed.entry.length &lt;= maxNumberOfPostsPerLabel) ?
json.feed.entry.length : maxNumberOfPostsPerLabel;
for (var i = 0; i &lt; maxPosts; i++) {
var entry = json.feed.entry[i];
var alturl;

for (var k = 0; k &lt; entry.link.length; k++) {
if (entry.link[k].rel == &#39;alternate&#39;) {
alturl = entry.link[k].href;
break;
}
}
var li = document.createElement(&#39;li&#39;);
var a = document.createElement(&#39;a&#39;);
a.href = alturl;

if(a.href!=location.href) {
var txt = document.createTextNode(entry.title.$t);
a.appendChild(txt);
li.appendChild(a);
ul.appendChild(li);
}
}
for (var l = 0; l &lt; json.feed.link.length; l++) {
if (json.feed.link[l].rel == &#39;alternate&#39;) {
var raw = json.feed.link[l].href;
var label = raw.substr(homeUrl3.length+13);
var k;
for (k=0; k&lt;20; k++) label = label.replace(&quot;%20&quot;, &quot; &quot;);
var txt = document.createTextNode(label);
var h = document.createElement(&#39;b&#39;);
h.appendChild(txt);
var div1 = document.createElement(&#39;div&#39;);
div1.appendChild(h);
div1.appendChild(ul);
document.getElementById(&#39;data2007&#39;).appendChild(div1);
}
}
}
function search10(query, label) {

var script = document.createElement(&#39;script&#39;);
script.setAttribute(&#39;src&#39;, query + &#39;feeds/posts/default/-/&#39;
+ label +
&#39;?alt=json-in-script&amp;callback=listEntries10&#39;);
script.setAttribute(&#39;type&#39;, &#39;text/javascript&#39;);
document.documentElement.firstChild.appendChild(script);
}

var labelArray = new Array();
var numLabel = 0;

<b:loop values='data:posts' var='post'>
<b:loop values='data:post.labels' var='label'>
textLabel = &quot;<data:label.name/>&quot;;

var test = 0;
for (var i = 0; i &lt; labelArray.length; i++)
if (labelArray[i] == textLabel) test = 1;
if (test == 0) {
labelArray.push(textLabel);
var maxLabels = (labelArray.length &lt;= maxNumberOfLabels) ?
labelArray.length : maxNumberOfLabels;
if (numLabel &lt; maxLabels) {
search10(homeUrl3, textLabel);
numLabel++;
}
}
</b:loop>
</b:loop>
</script>
</div>

</div>
</b:if>

5.Now Paste it like the example below.
<b:if cond='data:blog.pageType == "item"'>
<style>.fullpost{display:inline;}</style>
<p><data:post.body/></p>

Paste Your Code here

<b:else/>
<style>.fullpost{display:none;}</style>
<p><data:post.body/>
<a expr:href='data:post.url'><strong>Read more...</strong></a></p>
</b:if>


6.Click on "Save Templates" and refresh your site.

How To Hidden Blogger Header and Replace Image Instead? 0

Blog101 | 2:45 PM | , ,

1.Log in to your dashboard--> layout- -> Edit HTML

2.Scroll down to where you see header-wrapper code block.It will nearly look like this:

#header-wrapper {
width:800px;
margin:0 auto 10px;
border:1px solid $bordercolor;
}


Note :- width:800px can be different value.

3.Now add "display:none;" into your header-wrapper code block.Look at below:

#header-wrapper {
width:800px;
margin:0 auto 10px;
border:1px solid $bordercolor;
display:none;
}


Done. above code hides your blog header.

4.To use a image instead header,find the below code.

<div id='header-wrapper'>
<b:section class='header' id='header' maxwidgets='1' showaddelement='no'>
<b:widget id='Header1' locked='true' title='your header title' type='Header'/>
</b:section>
</div>


5.Now paste the below code just after the above code.

<a href="URL_OF_YOUR_BLOG"><img src="URL_OF_THE_IMAGE" alt="Home" /></a>


Note : Replace URL_OF_YOUR_BLOG and URL_OF_THE_IMAGE with your content.

6.Click on "Save Templates" and you are done.

How to Add “Save Page as PDF” button to Blogger blog? 0

Blog101 | 2:10 PM | , ,

1.First Sign up with Web2PDF.

2.Now Configure your "Save Page as PDF" button and click "Generate the JavaScript" button.

3.Then a Javascript code will be generated. Copy This code.

Now follow these simple steps :

(a)Log in to your dashboard--> layout- -> Edit HTML

(b)Click on "Expand Widget Templates"

(c)Scroll down to where you see this:

<data:post.body/>


(d)Immediately after above line, paste the code which you have generated at the Web2Pdf Online website. It's look like below code:

<!-- START: PDF Online Script -->
<script type="text/javascript">
var authorId = "XXXXXXXX-XXXX-XXXX-XXX-XXXXXXX";
var pageOrientation = "0";
var topMargin = "0.5";
var bottomMargin = "0.5";
var leftMargin = "0.5";
var rightMargin = "0.5";
</script>
<script type="text/javascript" src="http://web2.pdfonline.com/pdfonline/pdfonline.js">
</script>
<!-- END: PDF Online Script -->


(e)Click on "Save Templates" and Refresh your site.

How To Add Page Popularity and Top popular pages widget? 0

Blog101 | 1:50 PM | , , ,

1.Log in to your dashboard--> layout- -> Edit HTML

2.Click on "Expand Widget Templates"

3.Scroll down to where you see this:-


<p><data:post.body/></p>

Add Page Popularity Widget

Paste the below code just after <p><data:post.body/></p>.


<img expr:src='"http://foxrecord.appspot.com/rating?url=" + data:post.url + "&amp;title=" + data:post.title' />


Add Top popular pages widget

Paste the below code just after <p><data:post.body/></p>.


<script src="http://foxrecord.com/scripts/gettop.js" type="text/javascript"></script>


4.Click on "Save Templates" and you are done.

How To Highlight Author Comment in Blogger blog? 0

Blog101 | 11:21 AM | , , ,

This tip is very usefull for every blogger.If you like this follow the steps below.

1.Log in to your dashboard--> layout- -> Edit HTML

2.Click on "Expand Widget Templates"

3.Scroll down to where you see this:-

]]></b:skin>

4.Copy below code and put it before ]]></b:skin>

.comment-body-author {
background: #E6E6E6; /* Background color*/
color: #000; /* Text color*/
border-top: 1px dotted #223344;border-bottom: 1px dotted #223344;border-left: 1px dotted #223344;border-right: 1px dotted #223344;
margin:0;
padding:0 0 0 20px; /* Posotion*/
}

5.Now Scroll down to where you see this:-

<dl id='comments-block'>
<b:loop values='data:post.comments' var='comment'>
<dt class='comment-author' expr:id='"comment-" + data:comment.id'>
<a expr:name='"comment-" + data:comment.id'/>
<b:if cond='data:comment.authorUrl'>
<a expr:href='data:comment.authorUrl' rel='nofollow'><data:comment.author/></a>
<b:else/>
<data:comment.author/>
</b:if>
said...
</dt>

<dd class='comment-body'>
<b:if cond='data:comment.isDeleted'>
<span class='deleted-comment'><data:comment.body/></span>
<b:else/>
<p><data:comment.body/></p>
</b:if>
</dd>

6.Replace above code with below code.

<dl id='comments-block'>
<b:loop values='data:post.comments' var='comment'>
<dt class='comment-author' expr:id='"comment-" + data:comment.id'>
<a expr:name='"comment-" + data:comment.id'/>
<b:if cond='data:comment.authorUrl'>
<a expr:href='data:comment.authorUrl' rel='nofollow'><data:comment.author/></a>
<b:else/>
<data:comment.author/>
</b:if>
said...
</dt>

<b:if cond='data:comment.author == data:post.author'>
<dd class='comment-body-author'>
<p><data:comment.body/></p>
</dd>
<b:else/>

<dd class='comment-body'>
<b:if cond='data:comment.isDeleted'>
<span class='deleted-comment'><data:comment.body/></span>
<b:else/>
<p><data:comment.body/></p>
</b:if>
</dd>

</b:if>

7.Click on "Save Templates" and you are done.

Note : You can change "Background color" , "Text color" and "Posotion" of above codes.

How To Change Colours of Blogger Templates? 0

Blog101 | 7:27 AM | , ,

How To Change Blogger Header background color
log in to your dashboard--> layout- -> Edit HTML, scroll to where you see this:-

#header-wrapper {


Add immediately after that the following line:-

background:your clour;

If You want background colour set to #D3FFCC , above code must change like this.
background:#D3FFCC;

See the example below.

#header-wrapper {
background:#D3FFCC;

Save the template and refresh your site.


How To Change Blogger Main background color

log in to your dashboard--> layout- -> Edit HTML, scroll to where you see this:-

body {
background:$bgcolor;

If you want to set bgcolor to #d3ffcc , replace above code with this.

body {
background-color:#d3ffcc;
Save the template and refresh your site.

How To Change Blogger Post background color

log in to your dashboard--> layout- -> Edit HTML, scroll to where you see this:-

#main-wrapper {

If you want to set post color to #d3ffcc , replace above code with this.

#main-wrapper {
background-color:#d3ffcc;

Save the template and refresh your site.

How To Change Blogger Sidebar background color

log in to your dashboard--> layout- -> Edit HTML, scroll to where you see this:-

#sidebar-wrapper {
If you want to set sidebar color to #d3ffcc , replace above code with this.

#sidebar-wrapper {
background-color:#d3ffcc;

Save the template and refresh your site.

How To Remove Blogger Navbar? 0

Blog101 | 6:40 AM | , ,

This quick tutorial will show you how to remove/hidden blogger navbar from your blog.Follow the steps given below.


Login to your blogger dashboard--> layout- -> Edit HTML

Put the following code as the picture below.

#navbar-iframe { height:0px; visibility:hidden; display:none; }


Now save your template and you are done.

How To Move Newer, Home and Older Posts Links to top of Posts? 0

Blog101 | 6:33 AM | , ,

These navigation links are only available in the Layout Template.If you have a Classic template you have to upgrade by going to Template---->Customize Design--->Upgrade to get them.

log in to your dashboard--> layout- -> Edit HTML-->check Expand Widget Templates.Now scroll down to where you see this:-
<!-- navigation -->
<b:include name='nextprev'/>

If you want to show them only at the top you can Cut
these lines to remove to the Windows Clipboard.
or
If you want them both at the top and the bottom then do Copy.

Scroll up to find this code :

<b:includable id='main' var='top'>
<!-- posts -->
<div class='blog-posts'>

Paste the navigation code below the last line of the above code. Save Template and refresh your site.

If you want to customize them further you can change this code below as of your template :

#blog-pager-newer-link {
float: left;
}

#blog-pager-older-link {
float: right;
}

#blog-pager {
text-align: center;
}

Save Template and refresh your site.

How To Change Blogger Favicon? 0

Blog101 | 6:28 AM | ,


What is favicon? While using IE Firefox or Opera you will see an icon on the tab when u visit a page.This is called favicon.By default blogspot blogs have a favicon which looks ugly.See it here at the top of the post.So how to remove it? Goto Blogger Template>Edit Html There find the title tag which looks like


and immediately after that add the code given below.

<link href='URL-OF-YOUR-FAVICON' rel='shortcut icon' type='image/vnd.microsoft.icon'/>


Remember to replace "URL-OF-YOUR-FAVICON" with your icon file's url.

Now save your template and your done.