Showing posts with label How2. Show all posts

How To Avoid Getting Your AdSense Account Terminated? 0

Blog101 | 12:57 PM | , ,

Doing the wrong things in the AdSense and other forms of advertisements, whether intentionally or unintentionally, will result in a severe penalty, may get you banned and even have your account terminated.
Do not just think of the strategies you will be using to generate more earnings. Consider some things first before you actually get involved.
Hidden texts – Filling your advertisement page with texts to small to read, has the same color as the background and using css for the sole purpose of loading them with rich keywords content and copy will earn you a penalty award that is given to those who are hiding links.
Page cloaking – There is a common practice of using browser or bot sniffers to serve the bots of a different page other than the page your visitors will see. Loading a page with a bot that a human user will never see is a definite no-no. This is tricking them to click on something that you want but they may not want to go to.
Multiple submissions – Submitting multiple copies of your domain and pages is another thing to stay away from. For example, trying to submit a URL of an AdSense as two separate URL’s is the same as inviting trouble and even termination. Likewise, this is a reason to avoid auto submitters for those who are receiving submissions. Better check first if your domain is submitted already an a certain search engine before you try to submit to it again. If you see it there, then move on. No point contemplating whether to try and submit there again.
Link farms – Be wary of who and what are you linking your AdSense to. The search engines know that you cannot control your links in. But you can certainly control what you link to. Link farming has always been a rotten apple in the eyes of search engines, especially Google. That is reason enough to try and avoid them. Having a link higher than 100 on a single page will classify you as a link farm so try and not to make them higher than that.
Page rank for sale – If you have been online for quite some time, you will notice that there are some sites selling their PR links or trading them with other sites. If you are doing this, expect a ban anytime in the future. It is okay to sell ads or gain the link. But doing it on direct advertisement of your page rank is a way to get on search engines bad side.
Doorways – This is similar to cloaking pages. The common practice of a page loaded with choice keyword ads aimed at redirecting visitors to another “user-friendly” page is a big issue among search engines. There are many s3o firms offering this kind of services. Now that you know what they actually are, try to avoid them at all costs.
Multiple domains having the same content – In case you are not aware of it, search engines look at domains IP’s, registry dates and many others. Having multiple domains having the same exact content is not something you can hide from them. The same goes with content multiplied many times on separate pages, sub domains and forwarding multiple domains to the same content.

How to get your domain in 15 of the top 20 search results for a given keyword? 0

Blog101 | 11:51 AM | , ,

Here’s how to get your domain in 15 of the top 20 search results for a given keyword.
First, get a domain name that is based on the keyword or search term. Even if you have to get a .info or .mobi or whatever. Let’s assume you want to rank for cream puffs. Just go buy creampuffs.info or whatever. You can find SOMETHING.
Now – this isn’t how to get your SITE listed in 15 of the top 20 SERP results but how to get your domain name listed in 75% of the first 2 or 3 pages.
  • Create a myspace profile named Yourdomain.com
  • Submit 1 article to article directories with your keyword as the title
  • Upload Videos with your url in the description to Myspace tv
  • Create an Amazon AStore named Yourdomain-com
  • Create a channel on Youtube using your keyword
  • Post a topic on related forums with the keyword in the subject line. (try something like yourdomain.com may be for sale – anyone interested?)
  • Create a Yahoo Group called Yourdomain-com
  • Create a Google group called Yourdomain-com
  • Create a Mybloglog account named yourdomain.com
  • Use a social bookmarking program like BookMarking Demon
  • Upload video to AOL video with the title yourdomain.com and your url in the description
  • Run all of these urls (not your own site) through BMD, TrackBack Spider, Blogpinger, and whatever else you can leave on while you sleep.
Thats it. I can show you examples where I have done this, and MyDomain.Com or whatever is listed in not only 75% of the first 20 serp results, but also a huge amount of the following serp pages, as well.
If you don’t believe me, take a search term or phrase with mid level competition and try it. Wait a couple weeks at most.

How To Create "Scroll to Top" button? 0

Blog101 | 2:40 PM | , , ,

Scroll to top button is very useful for bloggers if their have long blogs.To Add "scroll to top" button to your blog ,follow the steps below.
1.Log in to your dashboard--> layout- -> Edit HTML

2.Scroll down to where you see this:
]]></b:skin>
3.Now add below CSS code before  ]]></b:skin>  tag .
/* to top */
#toTop { width:100px;background:#F4FFBF;border:1px solid #ccc;text-align:center;padding:5px;position:fixed;bottom:10px;right:10px;cursor:pointer;color:#666;text-decoration:none; }


4.Now add below code  before  </body>  tag:
<a href="#" id="toTop">^ Scroll to Top</a>


<script src='http://ajax.googleapis.com/ajax/libs/jquery/1.3.2/jquery.min.js' type='text/javascript'></script>
<script type='text/javascript'>
/*-----------------------
* jQuery Plugin: Scroll to Top
* by Craig Wilson, Ph.Creative (http://www.ph-creative.com)
* Bring to you by Zen from http://zenplate.blogspot.com
* Copyright (c) 2009 Ph.Creative Ltd.
* Description: Adds an unobtrusive "Scroll to Top" link to your page with smooth scrolling.
* For usage instructions and version updates to go http://blog.ph-creative.com/post/jquery-plugin-scroll-to-top.aspx
* Do not delete these infomation
* Version: 1.0, 12/03/2009
-----------------------*/

$(function(){$.fn.scrollToTop=function(){$(this).hide().removeAttr("href");if($(window).scrollTop()!="0"){$(this).fadeIn("slow")}var scrollDiv=$(this);$(window).scroll(function(){if($(window).scrollTop()=="0"){$(scrollDiv).fadeOut("slow")}else{$(scrollDiv).fadeIn("slow")}});$(this).click(function(){$("html, body").animate({scrollTop:0},"slow")})}});

$(function() {
$("#toTop").scrollToTop();
});
</script>
5.Now save your template and you are done.Look at the picture below.

How To Delete "Border" when adding images in blogger? 0

Blog101 | 1:39 PM | , , ,

1.Log in to your dashboard--> layout- -> Edit HTML

2.Click on "Expand Widget Templates"
3.Scroll down to where you see this:
.post img {

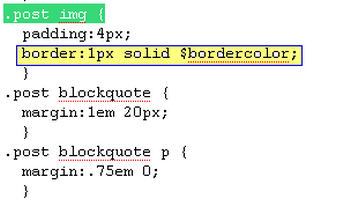
4.Now look at the picture below.

5.Delete yellow part ( border:1px solid $bordercolor; ) of the picture from your template.
Note : If you can not find exactly similar code to  border:1px solid $bordercolor;  , delete the part has the word "border"
6.Now save your template and you are done.

How To Add Floating Bar on Top of blogger blog? 0

Blog101 | 12:43 PM | , , ,

1.Log in to your dashboard--> layout- ->Page Elements
2.Click on 'Add a Gadget' on the sidebar.
3.Select 'HTML/Javascript' and add the code given below and click save.
<style type="text/css">
#topbar{
position:absolute;
border: 1px solid black;
padding: 2px;
background-color: lightyellow;
width: 620px;

visibility: hidden;
z-index: 100;
}
</style>

<script type="text/javascript">
/***********************************************
* Floating Top Bar script- © Dynamic Drive (www.dynamicdrive.com)
* Sliding routine by Roy Whittle (http://www.javascript-fx.com/)
* This notice must stay intact for legal use.
* Visit http://www.dynamicdrive.com/ for full source code
*Make it works on blogger by Zen :http://zenplate.blogspot.com
***********************************************/

var persistclose=0 //set to 0 or 1. 1 means once the bar is manually closed, it will remain closed for browser session
var startX = 30 //set x offset of bar in pixels
var startY = 5 //set y offset of bar in pixels
var verticalpos="fromtop" //enter "fromtop" or "frombottom"

function iecompattest(){
return (document.compatMode && document.compatMode!="BackCompat")? document.documentElement : document.body
}

function get_cookie(Name) {
var search = Name + "="
var returnvalue = "";
if (document.cookie.length > 0) {
offset = document.cookie.indexOf(search)
if (offset != -1) {
offset += search.length
end = document.cookie.indexOf(";", offset);
if (end == -1) end = document.cookie.length;
returnvalue=unescape(document.cookie.substring(offset, end))
}
}
return returnvalue;
}

function closebar(){
if (persistclose)
document.cookie="remainclosed=1"
document.getElementById("topbar").style.visibility="hidden"
}

function staticbar(){
barheight=document.getElementById("topbar").offsetHeight
var ns = (navigator.appName.indexOf("Netscape") != -1) || window.opera;
var d = document;
function ml(id){
var el=d.getElementById(id);
if (!persistclose || persistclose && get_cookie("remainclosed")=="")
el.style.visibility="visible"
if(d.layers)el.style=el;
el.sP=function(x,y){this.style.left=x+"px";this.style.top=y+"px";};
el.x = startX;
if (verticalpos=="fromtop")
el.y = startY;
else{
el.y = ns ? pageYOffset + innerHeight : iecompattest().scrollTop + iecompattest().clientHeight;
el.y -= startY;
}
return el;
}
window.stayTopLeft=function(){
if (verticalpos=="fromtop"){
var pY = ns ? pageYOffset : iecompattest().scrollTop;
ftlObj.y += (pY + startY - ftlObj.y)/8;
}
else{
var pY = ns ? pageYOffset + innerHeight - barheight: iecompattest().scrollTop + iecompattest().clientHeight - barheight;
ftlObj.y += (pY - startY - ftlObj.y)/8;
}
ftlObj.sP(ftlObj.x, ftlObj.y);
setTimeout("stayTopLeft()", 10);
}
ftlObj = ml("topbar");
stayTopLeft();
}

if (window.addEventListener)
window.addEventListener("load", staticbar, false)
else if (window.attachEvent)
window.attachEvent("onload", staticbar)
else if (document.getElementById)
window.onload=staticbar
</script>

<div id="topbar">
<a href="#" onclick="closebar(); return false"><img src="http://www.gigaimage.com/images/6gxult9ji6pxr9r7wo.gif" align="right" border="0" />
<a href="YOUR LINK" onclick="closebar(); return true">YOUR TEXT
</div>
Note : Remember to replace YOUR LINK and YOUR TEXT with your details.

How To Add Twit This! Icon below your blog post? 0

Blog101 | 12:39 PM | , , ,

1.Log in to your dashboard--> layout- -> Edit HTML

2.Click on "Expand Widget Templates"
3.Scroll down to where you see this:
]]></b:skin>
4.Now copy below code and paste it before above code.
.share-twitthis{
background:url(http://tinyurl.com/ay2jsc) 10px top no-repeat;
padding-left:42px;
font-size:11px;
line-height:18px;
}
Look at the picture below.

5.Now again scroll down to where you see this :
<p><data:post.body/></p>
6.Copy and paste below right after above line.
<div class='share-twitthis'>
<a expr:href='&quot;http://twitthis.com/twit?url=&quot; + data:post.url + &quot;&amp;title=&quot; + data:post.title'>Twit This!</a></div>
7.Now save your template and you are done.

How To Add Related Post Widget to Blogger? 0

Blog101 | 7:05 AM | , , ,

There some advantages of adding the related post widget in your blog ; the reader will be able to find more articles that related to the article they are reading and Reader can stay longer in your blog .
1.Log in to your dashboard--> layout- -> Edit HTML
2.Click on "Expand Widget Templates"
3.Scroll down to where you see this:
<data:post.body/>
4.After the above code , copy and paste the code below:
<!--Related Post javascripts start from here-->
<b:if cond='data:blog.pageType == &quot;item&quot;'>
<div class='similiar'>

<div class='widget-content'>
<h3>Related Posts :</h3>
<div id='data2007'/><br/><br/>
<script type='text/javascript'>

var homeUrl3 = &quot;<data:blog.homepageUrl/>&quot;;
var maxNumberOfPostsPerLabel = 4;
var maxNumberOfLabels = 10;

maxNumberOfPostsPerLabel = 100;
maxNumberOfLabels = 3;

function listEntries10(json) {
var ul = document.createElement(&#39;ul&#39;);
var maxPosts = (json.feed.entry.length &lt;= maxNumberOfPostsPerLabel) ?
json.feed.entry.length : maxNumberOfPostsPerLabel;
for (var i = 0; i &lt; maxPosts; i++) {
var entry = json.feed.entry[i];
var alturl;

for (var k = 0; k &lt; entry.link.length; k++) {
if (entry.link[k].rel == &#39;alternate&#39;) {
alturl = entry.link[k].href;
break;
}
}
var li = document.createElement(&#39;li&#39;);
var a = document.createElement(&#39;a&#39;);
a.href = alturl;

if(a.href!=location.href) {
var txt = document.createTextNode(entry.title.$t);
a.appendChild(txt);
li.appendChild(a);
ul.appendChild(li);
}
}
for (var l = 0; l &lt; json.feed.link.length; l++) {
if (json.feed.link[l].rel == &#39;alternate&#39;) {
var raw = json.feed.link[l].href;
var label = raw.substr(homeUrl3.length+13);
var k;
for (k=0; k&lt;20; k++) label = label.replace(&quot;%20&quot;, &quot; &quot;);
var txt = document.createTextNode(label);
var h = document.createElement(&#39;b&#39;);
h.appendChild(txt);
var div1 = document.createElement(&#39;div&#39;);
div1.appendChild(h);
div1.appendChild(ul);
document.getElementById(&#39;data2007&#39;).appendChild(div1);
}
}
}
function search10(query, label) {

var script = document.createElement(&#39;script&#39;);
script.setAttribute(&#39;src&#39;, query + &#39;feeds/posts/default/-/&#39;
+ label +
&#39;?alt=json-in-script&amp;callback=listEntries10&#39;);
script.setAttribute(&#39;type&#39;, &#39;text/javascript&#39;);
document.documentElement.firstChild.appendChild(script);
}

var labelArray = new Array();
var numLabel = 0;

<b:loop values='data:posts' var='post'>
<b:loop values='data:post.labels' var='label'>
textLabel = &quot;<data:label.name/>&quot;;

var test = 0;
for (var i = 0; i &lt; labelArray.length; i++)
if (labelArray[i] == textLabel) test = 1;
if (test == 0) {
labelArray.push(textLabel);
var maxLabels = (labelArray.length &lt;= maxNumberOfLabels) ?
labelArray.length : maxNumberOfLabels;
if (numLabel &lt; maxLabels) {
search10(homeUrl3, textLabel);
numLabel++;
}
}
</b:loop>
</b:loop>
</script>
</div>

</div>
</b:if>
<!--Related Post javascripts End here-->


5.Click on "Save Templates" and refresh your site.

How To Add Top Commentators Widget for Blogger? 0

Blog101 | 3:04 PM | , ,

If you like to add Top Commentators Widget to your blog follow the steps below.It will increase the commenting rate on blogs.
1.Log in to your dashboard--> layout- ->Page Elements

2.Click on 'Add a Gadget' on the sidebar.

3.Select 'HTML/Javascript' and add the code given below and click save.

<script type="text/javascript">
function pipeCallback(obj) {
document.write('<ol>');
var i;
for (i = 0; i < obj.count ; i++)
{
var href = "'" + obj.value.items[i].link + "'";
if(obj.value.items[i].link == "")
var item ="<li>" + obj.value.items[i].title + "</li>";
else
var item = "<li>" + "<a href=" + href + ">" + obj.value.items[i].title + "</a> </li>";
document.write(item);
}
document.write('</ol>');
}
</script>
<script src="http://pipes.yahoo.com/pipes/pipe.run?_render=json&_callback=pipeCallback&_id=2f414149ab66e0892a6a179016f93019&url=http%3A%2F%2Fyourblog.blogspot.com&num=10&filter=" type="text/javascript"></script>


Note : Remember to replace yourblog with your blog name.Do not include http://

You are done.

How To Remove 'Showing Posts With Label'? 0

Blog101 | 1:45 PM | , ,

1.Log in to your dashboard--> layout- -> Edit HTML

2.Click on "Expand Widget Templates"
3.Scroll down to where you see this:-
<b:includable id='status-message'>
<b:if cond='data:navMessage'>
<div class='status-msg-wrap'>
<div class='status-msg-body'>
<data:navMessage/>
</div>
<div class='status-msg-border'>
<div class='status-msg-bg'>
<div class='status-msg-hidden'><data:navMessage/></div>
</div>
</div>
</div>
<div style='clear: both;'/>
</b:if>
</b:includable>
4.Now Replace above code with below code :
<b:includable id='status-message'>
<b:if cond='data:navMessage'>
<div>
</div>
<div style='clear: both;'/>
</b:if>
</b:includable>
5.Click on "Save Templates" and you are done.

How To Add Feedburner FeedFlare below yourBlog Post? 0

Blog101 | 1:00 PM | , ,

If you want to add the FeedFlare to your blog follow the instruction below.
1. Login to your Feedburner account.
2. Click on the Feed Title.
3. Click on Optimize Tab.
4. Click on FeedFlare.

5. Check on the services you want to display in your Feed or on your Site.

6.There is a FeedFlare Preview/Ordering below the list of services. This lets you see how FeedFlare will appear in your feed and/or on your site. Just Click and Drag the links on the location that you want.

7.Click on "Activate".Now You will get this message.

8.Now in this window Before the Save button, there is a "Get the HTML code to put FeedFlare on your site". Choose the Blogging Platform as "Blogger"
9. A pop-up window will appear and it contains the instructions on how you embed the Feed burner FeedFlare on your blog.Just follow the instructions.Now wait about 20 minutes and refresh your site.Look at the example below.

How To add Image Icon Before or After Post Titles? 0

Blog101 | 5:39 PM | , ,

1.Log in to your dashboard--> layout- -> Edit HTML

2.Click on "Expand Widget Templates"
3.Scroll down to where you see this:-


<b:if cond='data:post.url'>
<a expr:href='data:post.url'><data:post.title/></a>
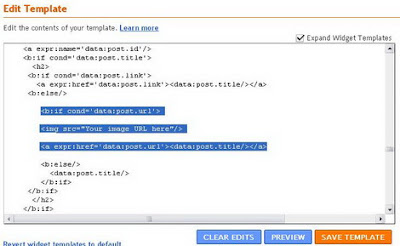
4.If you want to add image Before post title then add below code between above 2 lines.


<img src="Your image URL here"/>
Note : Remember to Replace "Your image URL here" with your real image URL.
After adding code, it look like below.


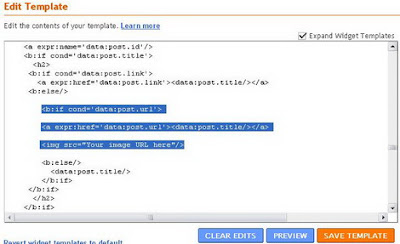
If you want to add image After post title then add the code like this.(after the above 2 lines)

5.Click on "Save Templates" and you are done.

How To Add Icons on Every Blogger Widget of Blogger ? 0

Blog101 | 4:36 PM | , ,

Adding Icons on your Every Blogger Widget , you can give a good look to your blog.Follow these simple steps to do it.
1.Log in to your dashboard--> layout- -> Edit HTML
2.Click on "Expand Widget Templates"
3.Scroll down to where you see this:
.main .Blog {
border-bottom-width: 0;
}
4.After the above code , copy and paste the code below:
.sidebar .widget h2 {
background: yellow url('URL OF YOUR IMAGE') no-repeat left top;
margin-top:5px;
text-indent: 20px;
padding:7px;
}
5.Click on "Save Templates" and you are done.
Note : You must replace URL OF YOUR IMAGE with your image(Icon) URL.
You can change background colour and other values of above codes if you like.

Add Related Post Widget to Blogger-For Original Templates 0

Blog101 | 3:54 PM | , ,

1.Log in to your dashboard--> layout- -> Edit HTML
2.Click on "Expand Widget Templates"
3.Scroll down to where you see this:
<div class='post-body entry-content'>
<data:post.body/>
<div style='clear: both;'/> <!-- clear for photos floats -->
</div>

4.Copy below code and paste it immediately after the line <data:post.body/>

<b:if cond='data:blog.pageType == "item"'>
<div class='similiar'>

<div class='widget-content'>
<h3>Related Posts :</h3>
<div id='data2007'/><br/><br/>
<script type='text/javascript'>

var homeUrl3 = &quot;<data:blog.homepageUrl/>&quot;;
var maxNumberOfPostsPerLabel = 4;
var maxNumberOfLabels = 10;

maxNumberOfPostsPerLabel = 100;
maxNumberOfLabels = 3;


function listEntries10(json) {
var ul = document.createElement(&#39;ul&#39;);
var maxPosts = (json.feed.entry.length &lt;= maxNumberOfPostsPerLabel) ?
json.feed.entry.length : maxNumberOfPostsPerLabel;
for (var i = 0; i &lt; maxPosts; i++) {
var entry = json.feed.entry[i];
var alturl;

for (var k = 0; k &lt; entry.link.length; k++) {
if (entry.link[k].rel == &#39;alternate&#39;) {
alturl = entry.link[k].href;
break;
}
}
var li = document.createElement(&#39;li&#39;);
var a = document.createElement(&#39;a&#39;);
a.href = alturl;

if(a.href!=location.href) {
var txt = document.createTextNode(entry.title.$t);
a.appendChild(txt);
li.appendChild(a);
ul.appendChild(li);
}
}
for (var l = 0; l &lt; json.feed.link.length; l++) {
if (json.feed.link[l].rel == &#39;alternate&#39;) {
var raw = json.feed.link[l].href;
var label = raw.substr(homeUrl3.length+13);
var k;
for (k=0; k&lt;20; k++) label = label.replace(&quot;%20&quot;, &quot; &quot;);
var txt = document.createTextNode(label);
var h = document.createElement(&#39;b&#39;);
h.appendChild(txt);
var div1 = document.createElement(&#39;div&#39;);
div1.appendChild(h);
div1.appendChild(ul);
document.getElementById(&#39;data2007&#39;).appendChild(div1);
}
}
}
function search10(query, label) {

var script = document.createElement(&#39;script&#39;);
script.setAttribute(&#39;src&#39;, query + &#39;feeds/posts/default/-/&#39;
+ label +
&#39;?alt=json-in-script&amp;callback=listEntries10&#39;);
script.setAttribute(&#39;type&#39;, &#39;text/javascript&#39;);
document.documentElement.firstChild.appendChild(script);
}

var labelArray = new Array();
var numLabel = 0;

<b:loop values='data:posts' var='post'>
<b:loop values='data:post.labels' var='label'>
textLabel = &quot;<data:label.name/>&quot;;

var test = 0;
for (var i = 0; i &lt; labelArray.length; i++)
if (labelArray[i] == textLabel) test = 1;
if (test == 0) {
labelArray.push(textLabel);
var maxLabels = (labelArray.length &lt;= maxNumberOfLabels) ?
labelArray.length : maxNumberOfLabels;
if (numLabel &lt; maxLabels) {
search10(homeUrl3, textLabel);
numLabel++;
}
}
</b:loop>
</b:loop>
</script>
</div>

</div>
</b:if>

5.Click on "Save Templates" and refresh your site.

How To Hidden Blogger Header and Replace Image Instead? 0

Blog101 | 2:45 PM | , ,

1.Log in to your dashboard--> layout- -> Edit HTML

2.Scroll down to where you see header-wrapper code block.It will nearly look like this:

#header-wrapper {
width:800px;
margin:0 auto 10px;
border:1px solid $bordercolor;
}


Note :- width:800px can be different value.

3.Now add "display:none;" into your header-wrapper code block.Look at below:

#header-wrapper {
width:800px;
margin:0 auto 10px;
border:1px solid $bordercolor;
display:none;
}


Done. above code hides your blog header.

4.To use a image instead header,find the below code.

<div id='header-wrapper'>
<b:section class='header' id='header' maxwidgets='1' showaddelement='no'>
<b:widget id='Header1' locked='true' title='your header title' type='Header'/>
</b:section>
</div>


5.Now paste the below code just after the above code.

<a href="URL_OF_YOUR_BLOG"><img src="URL_OF_THE_IMAGE" alt="Home" /></a>


Note : Replace URL_OF_YOUR_BLOG and URL_OF_THE_IMAGE with your content.

6.Click on "Save Templates" and you are done.

How to Add “Save Page as PDF” button to Blogger blog? 0

Blog101 | 2:10 PM | , ,

1.First Sign up with Web2PDF.

2.Now Configure your "Save Page as PDF" button and click "Generate the JavaScript" button.

3.Then a Javascript code will be generated. Copy This code.

Now follow these simple steps :

(a)Log in to your dashboard--> layout- -> Edit HTML

(b)Click on "Expand Widget Templates"

(c)Scroll down to where you see this:

<data:post.body/>


(d)Immediately after above line, paste the code which you have generated at the Web2Pdf Online website. It's look like below code:

<!-- START: PDF Online Script -->
<script type="text/javascript">
var authorId = "XXXXXXXX-XXXX-XXXX-XXX-XXXXXXX";
var pageOrientation = "0";
var topMargin = "0.5";
var bottomMargin = "0.5";
var leftMargin = "0.5";
var rightMargin = "0.5";
</script>
<script type="text/javascript" src="http://web2.pdfonline.com/pdfonline/pdfonline.js">
</script>
<!-- END: PDF Online Script -->


(e)Click on "Save Templates" and Refresh your site.

How To Add Page Popularity and Top popular pages widget? 0

Blog101 | 1:50 PM | , , ,

1.Log in to your dashboard--> layout- -> Edit HTML

2.Click on "Expand Widget Templates"

3.Scroll down to where you see this:-


<p><data:post.body/></p>

Add Page Popularity Widget

Paste the below code just after <p><data:post.body/></p>.


<img expr:src='"http://foxrecord.appspot.com/rating?url=" + data:post.url + "&amp;title=" + data:post.title' />


Add Top popular pages widget

Paste the below code just after <p><data:post.body/></p>.


<script src="http://foxrecord.com/scripts/gettop.js" type="text/javascript"></script>


4.Click on "Save Templates" and you are done.

How To Highlight Author Comment in Blogger blog? 0

Blog101 | 11:21 AM | , , ,

This tip is very usefull for every blogger.If you like this follow the steps below.

1.Log in to your dashboard--> layout- -> Edit HTML

2.Click on "Expand Widget Templates"

3.Scroll down to where you see this:-

]]></b:skin>

4.Copy below code and put it before ]]></b:skin>

.comment-body-author {
background: #E6E6E6; /* Background color*/
color: #000; /* Text color*/
border-top: 1px dotted #223344;border-bottom: 1px dotted #223344;border-left: 1px dotted #223344;border-right: 1px dotted #223344;
margin:0;
padding:0 0 0 20px; /* Posotion*/
}

5.Now Scroll down to where you see this:-

<dl id='comments-block'>
<b:loop values='data:post.comments' var='comment'>
<dt class='comment-author' expr:id='"comment-" + data:comment.id'>
<a expr:name='"comment-" + data:comment.id'/>
<b:if cond='data:comment.authorUrl'>
<a expr:href='data:comment.authorUrl' rel='nofollow'><data:comment.author/></a>
<b:else/>
<data:comment.author/>
</b:if>
said...
</dt>

<dd class='comment-body'>
<b:if cond='data:comment.isDeleted'>
<span class='deleted-comment'><data:comment.body/></span>
<b:else/>
<p><data:comment.body/></p>
</b:if>
</dd>

6.Replace above code with below code.

<dl id='comments-block'>
<b:loop values='data:post.comments' var='comment'>
<dt class='comment-author' expr:id='"comment-" + data:comment.id'>
<a expr:name='"comment-" + data:comment.id'/>
<b:if cond='data:comment.authorUrl'>
<a expr:href='data:comment.authorUrl' rel='nofollow'><data:comment.author/></a>
<b:else/>
<data:comment.author/>
</b:if>
said...
</dt>

<b:if cond='data:comment.author == data:post.author'>
<dd class='comment-body-author'>
<p><data:comment.body/></p>
</dd>
<b:else/>

<dd class='comment-body'>
<b:if cond='data:comment.isDeleted'>
<span class='deleted-comment'><data:comment.body/></span>
<b:else/>
<p><data:comment.body/></p>
</b:if>
</dd>

</b:if>

7.Click on "Save Templates" and you are done.

Note : You can change "Background color" , "Text color" and "Posotion" of above codes.

How To Change Colours of Blogger Templates? 0

Blog101 | 7:27 AM | , ,

How To Change Blogger Header background color
log in to your dashboard--> layout- -> Edit HTML, scroll to where you see this:-

#header-wrapper {


Add immediately after that the following line:-

background:your clour;

If You want background colour set to #D3FFCC , above code must change like this.
background:#D3FFCC;

See the example below.

#header-wrapper {
background:#D3FFCC;

Save the template and refresh your site.


How To Change Blogger Main background color

log in to your dashboard--> layout- -> Edit HTML, scroll to where you see this:-

body {
background:$bgcolor;

If you want to set bgcolor to #d3ffcc , replace above code with this.

body {
background-color:#d3ffcc;
Save the template and refresh your site.

How To Change Blogger Post background color

log in to your dashboard--> layout- -> Edit HTML, scroll to where you see this:-

#main-wrapper {

If you want to set post color to #d3ffcc , replace above code with this.

#main-wrapper {
background-color:#d3ffcc;

Save the template and refresh your site.

How To Change Blogger Sidebar background color

log in to your dashboard--> layout- -> Edit HTML, scroll to where you see this:-

#sidebar-wrapper {
If you want to set sidebar color to #d3ffcc , replace above code with this.

#sidebar-wrapper {
background-color:#d3ffcc;

Save the template and refresh your site.

How To Remove Blogger Navbar? 0

Blog101 | 6:40 AM | , ,

This quick tutorial will show you how to remove/hidden blogger navbar from your blog.Follow the steps given below.


Login to your blogger dashboard--> layout- -> Edit HTML

Put the following code as the picture below.

#navbar-iframe { height:0px; visibility:hidden; display:none; }


Now save your template and you are done.

How To Move Newer, Home and Older Posts Links to top of Posts? 0

Blog101 | 6:33 AM | , ,

These navigation links are only available in the Layout Template.If you have a Classic template you have to upgrade by going to Template---->Customize Design--->Upgrade to get them.

log in to your dashboard--> layout- -> Edit HTML-->check Expand Widget Templates.Now scroll down to where you see this:-
<!-- navigation -->
<b:include name='nextprev'/>

If you want to show them only at the top you can Cut
these lines to remove to the Windows Clipboard.
or
If you want them both at the top and the bottom then do Copy.

Scroll up to find this code :

<b:includable id='main' var='top'>
<!-- posts -->
<div class='blog-posts'>

Paste the navigation code below the last line of the above code. Save Template and refresh your site.

If you want to customize them further you can change this code below as of your template :

#blog-pager-newer-link {
float: left;
}

#blog-pager-older-link {
float: right;
}

#blog-pager {
text-align: center;
}

Save Template and refresh your site.