How To Add Twit This! Icon below your blog post? 0

Blog101 | 12:39 PM | , , ,

1.Log in to your dashboard--> layout- -> Edit HTML

2.Click on "Expand Widget Templates"
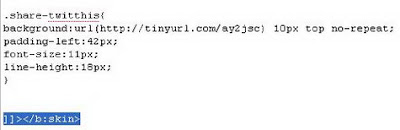
3.Scroll down to where you see this:
]]></b:skin>
4.Now copy below code and paste it before above code.
.share-twitthis{
background:url(http://tinyurl.com/ay2jsc) 10px top no-repeat;
padding-left:42px;
font-size:11px;
line-height:18px;
}
Look at the picture below.

5.Now again scroll down to where you see this :
<p><data:post.body/></p>
6.Copy and paste below right after above line.
<div class='share-twitthis'>
<a expr:href='&quot;http://twitthis.com/twit?url=&quot; + data:post.url + &quot;&amp;title=&quot; + data:post.title'>Twit This!</a></div>
7.Now save your template and you are done.

How To Add Related Post Widget to Blogger? 0

Blog101 | 7:05 AM | , , ,

There some advantages of adding the related post widget in your blog ; the reader will be able to find more articles that related to the article they are reading and Reader can stay longer in your blog .
1.Log in to your dashboard--> layout- -> Edit HTML
2.Click on "Expand Widget Templates"
3.Scroll down to where you see this:
<data:post.body/>
4.After the above code , copy and paste the code below:
<!--Related Post javascripts start from here-->
<b:if cond='data:blog.pageType == &quot;item&quot;'>
<div class='similiar'>

<div class='widget-content'>
<h3>Related Posts :</h3>
<div id='data2007'/><br/><br/>
<script type='text/javascript'>

var homeUrl3 = &quot;<data:blog.homepageUrl/>&quot;;
var maxNumberOfPostsPerLabel = 4;
var maxNumberOfLabels = 10;

maxNumberOfPostsPerLabel = 100;
maxNumberOfLabels = 3;

function listEntries10(json) {
var ul = document.createElement(&#39;ul&#39;);
var maxPosts = (json.feed.entry.length &lt;= maxNumberOfPostsPerLabel) ?
json.feed.entry.length : maxNumberOfPostsPerLabel;
for (var i = 0; i &lt; maxPosts; i++) {
var entry = json.feed.entry[i];
var alturl;

for (var k = 0; k &lt; entry.link.length; k++) {
if (entry.link[k].rel == &#39;alternate&#39;) {
alturl = entry.link[k].href;
break;
}
}
var li = document.createElement(&#39;li&#39;);
var a = document.createElement(&#39;a&#39;);
a.href = alturl;

if(a.href!=location.href) {
var txt = document.createTextNode(entry.title.$t);
a.appendChild(txt);
li.appendChild(a);
ul.appendChild(li);
}
}
for (var l = 0; l &lt; json.feed.link.length; l++) {
if (json.feed.link[l].rel == &#39;alternate&#39;) {
var raw = json.feed.link[l].href;
var label = raw.substr(homeUrl3.length+13);
var k;
for (k=0; k&lt;20; k++) label = label.replace(&quot;%20&quot;, &quot; &quot;);
var txt = document.createTextNode(label);
var h = document.createElement(&#39;b&#39;);
h.appendChild(txt);
var div1 = document.createElement(&#39;div&#39;);
div1.appendChild(h);
div1.appendChild(ul);
document.getElementById(&#39;data2007&#39;).appendChild(div1);
}
}
}
function search10(query, label) {

var script = document.createElement(&#39;script&#39;);
script.setAttribute(&#39;src&#39;, query + &#39;feeds/posts/default/-/&#39;
+ label +
&#39;?alt=json-in-script&amp;callback=listEntries10&#39;);
script.setAttribute(&#39;type&#39;, &#39;text/javascript&#39;);
document.documentElement.firstChild.appendChild(script);
}

var labelArray = new Array();
var numLabel = 0;

<b:loop values='data:posts' var='post'>
<b:loop values='data:post.labels' var='label'>
textLabel = &quot;<data:label.name/>&quot;;

var test = 0;
for (var i = 0; i &lt; labelArray.length; i++)
if (labelArray[i] == textLabel) test = 1;
if (test == 0) {
labelArray.push(textLabel);
var maxLabels = (labelArray.length &lt;= maxNumberOfLabels) ?
labelArray.length : maxNumberOfLabels;
if (numLabel &lt; maxLabels) {
search10(homeUrl3, textLabel);
numLabel++;
}
}
</b:loop>
</b:loop>
</script>
</div>

</div>
</b:if>
<!--Related Post javascripts End here-->


5.Click on "Save Templates" and refresh your site.

How To Add Top Commentators Widget for Blogger? 0

Blog101 | 3:04 PM | , ,

If you like to add Top Commentators Widget to your blog follow the steps below.It will increase the commenting rate on blogs.
1.Log in to your dashboard--> layout- ->Page Elements

2.Click on 'Add a Gadget' on the sidebar.

3.Select 'HTML/Javascript' and add the code given below and click save.

<script type="text/javascript">
function pipeCallback(obj) {
document.write('<ol>');
var i;
for (i = 0; i < obj.count ; i++)
{
var href = "'" + obj.value.items[i].link + "'";
if(obj.value.items[i].link == "")
var item ="<li>" + obj.value.items[i].title + "</li>";
else
var item = "<li>" + "<a href=" + href + ">" + obj.value.items[i].title + "</a> </li>";
document.write(item);
}
document.write('</ol>');
}
</script>
<script src="http://pipes.yahoo.com/pipes/pipe.run?_render=json&_callback=pipeCallback&_id=2f414149ab66e0892a6a179016f93019&url=http%3A%2F%2Fyourblog.blogspot.com&num=10&filter=" type="text/javascript"></script>


Note : Remember to replace yourblog with your blog name.Do not include http://

You are done.

Big Font Trick For Bloggers 0

Blog101 | 2:32 PM | ,

f you want become large first letter of your paragraph follow below steps to do it.
1.Log in to your dashboard--> layout- ->Edit HTML
2.Scroll down to where you see this :
]]></b:skin>
3.Now Add the below codes before  the above code.
.newspaper {
float:left;
color:#000;
background:#fff;
line-height:80px;
padding-:1px 5px 0 0;
font-family:times;
font-size:100px;
}
4.Now save your Template.
5.Now when you write a post ,add the below codes manually Before starting every post and Replace Frist Letter with your real post first letter.
<span class="newspaper">Frist Letter</span>


Look at the example below.
<span class="newspaper">T</span>oyota offers every type of vehicle from trucks to compact cars, giving you the option to choose the size and type of car that best fits your lifestyle. Many thing need to be considered when choosing a new car. If you have small children, safety is a large factor, as well as size depending on how many children you have. However, you may be a single mom or a bachelor simply looking for something fun and stylish. Either way, it’s important to find a car that makes you happy, and chances are high that a Pittsburgh Toyota will dealership can meet your needs.


Toyota offers every type of vehicle from trucks to compact cars, giving you the option to choose the size and type of car that best fits your lifestyle. Many thing need to be considered when choosing a new car. If you have small children, safety is a large factor, as well as size depending on how many children you have. However, you may be a single mom or a bachelor simply looking for something fun and stylish. Either way, it’s important to find a car that makes you happy, and chances are high that a Pittsburgh Toyota will dealership can meet your needs.

How To Remove 'Showing Posts With Label'? 0

Blog101 | 1:45 PM | , ,

1.Log in to your dashboard--> layout- -> Edit HTML

2.Click on "Expand Widget Templates"
3.Scroll down to where you see this:-
<b:includable id='status-message'>
<b:if cond='data:navMessage'>
<div class='status-msg-wrap'>
<div class='status-msg-body'>
<data:navMessage/>
</div>
<div class='status-msg-border'>
<div class='status-msg-bg'>
<div class='status-msg-hidden'><data:navMessage/></div>
</div>
</div>
</div>
<div style='clear: both;'/>
</b:if>
</b:includable>
4.Now Replace above code with below code :
<b:includable id='status-message'>
<b:if cond='data:navMessage'>
<div>
</div>
<div style='clear: both;'/>
</b:if>
</b:includable>
5.Click on "Save Templates" and you are done.

How To Add Feedburner FeedFlare below yourBlog Post? 0

Blog101 | 1:00 PM | , ,

If you want to add the FeedFlare to your blog follow the instruction below.
1. Login to your Feedburner account.
2. Click on the Feed Title.
3. Click on Optimize Tab.
4. Click on FeedFlare.

5. Check on the services you want to display in your Feed or on your Site.

6.There is a FeedFlare Preview/Ordering below the list of services. This lets you see how FeedFlare will appear in your feed and/or on your site. Just Click and Drag the links on the location that you want.

7.Click on "Activate".Now You will get this message.

8.Now in this window Before the Save button, there is a "Get the HTML code to put FeedFlare on your site". Choose the Blogging Platform as "Blogger"
9. A pop-up window will appear and it contains the instructions on how you embed the Feed burner FeedFlare on your blog.Just follow the instructions.Now wait about 20 minutes and refresh your site.Look at the example below.

How To add Image Icon Before or After Post Titles? 0

Blog101 | 5:39 PM | , ,

1.Log in to your dashboard--> layout- -> Edit HTML

2.Click on "Expand Widget Templates"
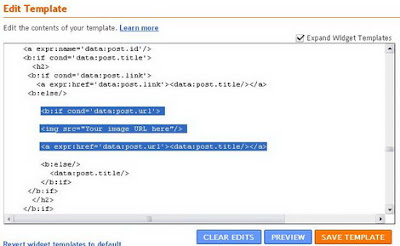
3.Scroll down to where you see this:-


<b:if cond='data:post.url'>
<a expr:href='data:post.url'><data:post.title/></a>
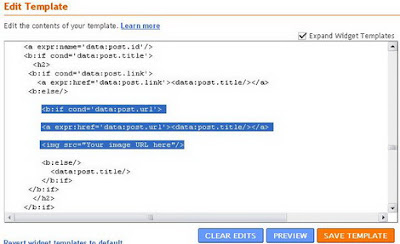
4.If you want to add image Before post title then add below code between above 2 lines.


<img src="Your image URL here"/>
Note : Remember to Replace "Your image URL here" with your real image URL.
After adding code, it look like below.


If you want to add image After post title then add the code like this.(after the above 2 lines)

5.Click on "Save Templates" and you are done.

How To Add Icons on Every Blogger Widget of Blogger ? 0

Blog101 | 4:36 PM | , ,

Adding Icons on your Every Blogger Widget , you can give a good look to your blog.Follow these simple steps to do it.
1.Log in to your dashboard--> layout- -> Edit HTML
2.Click on "Expand Widget Templates"
3.Scroll down to where you see this:
.main .Blog {
border-bottom-width: 0;
}
4.After the above code , copy and paste the code below:
.sidebar .widget h2 {
background: yellow url('URL OF YOUR IMAGE') no-repeat left top;
margin-top:5px;
text-indent: 20px;
padding:7px;
}
5.Click on "Save Templates" and you are done.
Note : You must replace URL OF YOUR IMAGE with your image(Icon) URL.
You can change background colour and other values of above codes if you like.

How To Add "Read More" Feature To Blogger Post? 0

Blog101 | 2:32 PM | ,

1.Log in to your dashboard--> layout- -> Edit HTML
2.Click on "Expand Widget Templates"
3.Scroll down to where you see this:
<p><data:post.body/></p>

4.Replace above code with below code.
<b:if cond='data:blog.pageType == "item"'>
<style>.fullpost{display:inline;}</style>
<p><data:post.body/></p>
<b:else/>
<style>.fullpost{display:none;}</style>
<p><data:post.body/>
<a expr:href='data:post.url'><strong>Read more...</strong></a></p>
</b:if>


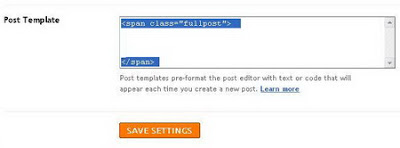
5.Click on "Save Templates"6.Now go to Setting-->formatting-->Post Template.
7.Fill that "Post Template" blank text area with below code :
<span class="fullpost">


</span>
Look at the picture below.

8.Click on "Save settings"
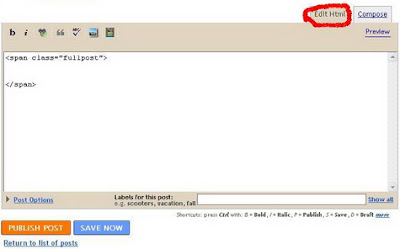
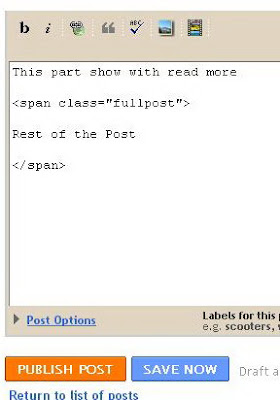
9.When you post your article, choose "Edit Html" tab. and you will see the code below :
<span class="fullpost">


</span>
Look at this image.


10.Place the paragraps you want show with read more, above of below line.
<span class="fullpost">
11.Place the rest of the post (you want to hide) between below 2 lines.
<span class="fullpost">


</span>


Look at the image below.

12.Then Publish your post.You are done.
Note :If you want to add this feature to your old posts ,do the 9-12 steps to each posts.

Add Related Post Widget to Blogger-For Modified Templates 0

Blog101 | 1:32 PM | , ,

1.Log in to your dashboard--> layout- -> Edit HTML
2.Click on "Expand Widget Templates"
3.Scroll down to where you see this:
<b:if cond='data:blog.pageType == "item"'>
<style>.fullpost{display:inline;}</style>
<p><data:post.body/></p>

<b:else/>
<style>.fullpost{display:none;}</style>
<p><data:post.body/>
<a expr:href='data:post.url'><strong>Read more...</strong></a></p>
</b:if>
4.Copy Below code.
<b:if cond='data:blog.pageType == "item"'>
<div class='similiar'>

<div class='widget-content'>
<h3>Related Posts :</h3>
<div id='data2007'/><br/><br/>
<script type='text/javascript'>

var homeUrl3 = &quot;<data:blog.homepageUrl/>&quot;;
var maxNumberOfPostsPerLabel = 4;
var maxNumberOfLabels = 10;

maxNumberOfPostsPerLabel = 100;
maxNumberOfLabels = 3;


function listEntries10(json) {
var ul = document.createElement(&#39;ul&#39;);
var maxPosts = (json.feed.entry.length &lt;= maxNumberOfPostsPerLabel) ?
json.feed.entry.length : maxNumberOfPostsPerLabel;
for (var i = 0; i &lt; maxPosts; i++) {
var entry = json.feed.entry[i];
var alturl;

for (var k = 0; k &lt; entry.link.length; k++) {
if (entry.link[k].rel == &#39;alternate&#39;) {
alturl = entry.link[k].href;
break;
}
}
var li = document.createElement(&#39;li&#39;);
var a = document.createElement(&#39;a&#39;);
a.href = alturl;

if(a.href!=location.href) {
var txt = document.createTextNode(entry.title.$t);
a.appendChild(txt);
li.appendChild(a);
ul.appendChild(li);
}
}
for (var l = 0; l &lt; json.feed.link.length; l++) {
if (json.feed.link[l].rel == &#39;alternate&#39;) {
var raw = json.feed.link[l].href;
var label = raw.substr(homeUrl3.length+13);
var k;
for (k=0; k&lt;20; k++) label = label.replace(&quot;%20&quot;, &quot; &quot;);
var txt = document.createTextNode(label);
var h = document.createElement(&#39;b&#39;);
h.appendChild(txt);
var div1 = document.createElement(&#39;div&#39;);
div1.appendChild(h);
div1.appendChild(ul);
document.getElementById(&#39;data2007&#39;).appendChild(div1);
}
}
}
function search10(query, label) {

var script = document.createElement(&#39;script&#39;);
script.setAttribute(&#39;src&#39;, query + &#39;feeds/posts/default/-/&#39;
+ label +
&#39;?alt=json-in-script&amp;callback=listEntries10&#39;);
script.setAttribute(&#39;type&#39;, &#39;text/javascript&#39;);
document.documentElement.firstChild.appendChild(script);
}

var labelArray = new Array();
var numLabel = 0;

<b:loop values='data:posts' var='post'>
<b:loop values='data:post.labels' var='label'>
textLabel = &quot;<data:label.name/>&quot;;

var test = 0;
for (var i = 0; i &lt; labelArray.length; i++)
if (labelArray[i] == textLabel) test = 1;
if (test == 0) {
labelArray.push(textLabel);
var maxLabels = (labelArray.length &lt;= maxNumberOfLabels) ?
labelArray.length : maxNumberOfLabels;
if (numLabel &lt; maxLabels) {
search10(homeUrl3, textLabel);
numLabel++;
}
}
</b:loop>
</b:loop>
</script>
</div>

</div>
</b:if>

5.Now Paste it like the example below.
<b:if cond='data:blog.pageType == "item"'>
<style>.fullpost{display:inline;}</style>
<p><data:post.body/></p>

Paste Your Code here

<b:else/>
<style>.fullpost{display:none;}</style>
<p><data:post.body/>
<a expr:href='data:post.url'><strong>Read more...</strong></a></p>
</b:if>


6.Click on "Save Templates" and refresh your site.